Easy Christmas Present Brownies
These Easy Christmas Present Brownies are decorated without any artificial colors! With a hint of espresso, they will have you channeling your inter Santa Claus, as they keep you going while you deck the halls!
If you’re looking for more Christmas inspired desserts, check out some of my other favorites like Dark Chocolate Peppermint Pretzel Bark, Christmas Lights Gingerbread Snack Cake, Mint Meltaways, or Holiday Sugar Cookies with Icing.
A Quick Look At The Recipe
- Recipe Name: Easy Christmas Present Brownies
- Ready In: 50 minutes
- Makes: 16 brownies
- Main Ingredients: canola oil, cane sugar, Dutch cocoa, all purpose flour
- Flavor Profile: rich chocolate espresso with sweet icing
- Dietary Info: vegan and gluten free swaps available
- Difficulty: Easy!
- Why You’ll Love It: easy and festive fudgy brownies for the holiday season
Summarize & Save This Content On
Why You'll Love This Recipe
- No Artificial Colors: When holidays come around, it can be challenging to be festive when you’re thinking of your health. While traditional holiday treats are loaded with artificial colors, these organic brownies are made without any artificial colors!
- Easy & Festive: These are a great quick and easy recipe that is so festive, you could even bake them as a gift!
- Eggless Brownies: These Easy Christmas Present Brownies are naturally eggless! So, if you’re just using up eggs left and right or making brunch nonstop, don’t worry because you don’t need eggs for this recipe. And you don’t even miss them!
- Better Than a Box: No boxed mix brownies here, yet they are just as quick and easy to mix up!
While I do have a sweet tooth, I'm not a huge fan of decorating. Maybe it was because it wasn't something I did as a kid. My mom wasn't a baker, so on the rare occasion we did bake, it was just classic chocolate chip or ginger cookies, that was really it! And, as a former bakery owner who got asked to decorate things on the regular (most always saying no!), I get that people want to decorate dessert (even if you are just going to eat it!).
Now that I have more free time away from a busy bakery, it's fun to take a few extra minutes and make decorated desserts here or there. These brownies are a perfect marriage of taste, decoration, and ease! If you want more simplified but festive treats, check out Vegan Christmas Tree Brownies, Chocolate Peppermint Christmas Tree Cupcakes, Whimsical North Pole Cupcakes, or Festive Gingerbread Snack Cake Without Frosting!
Ingredients
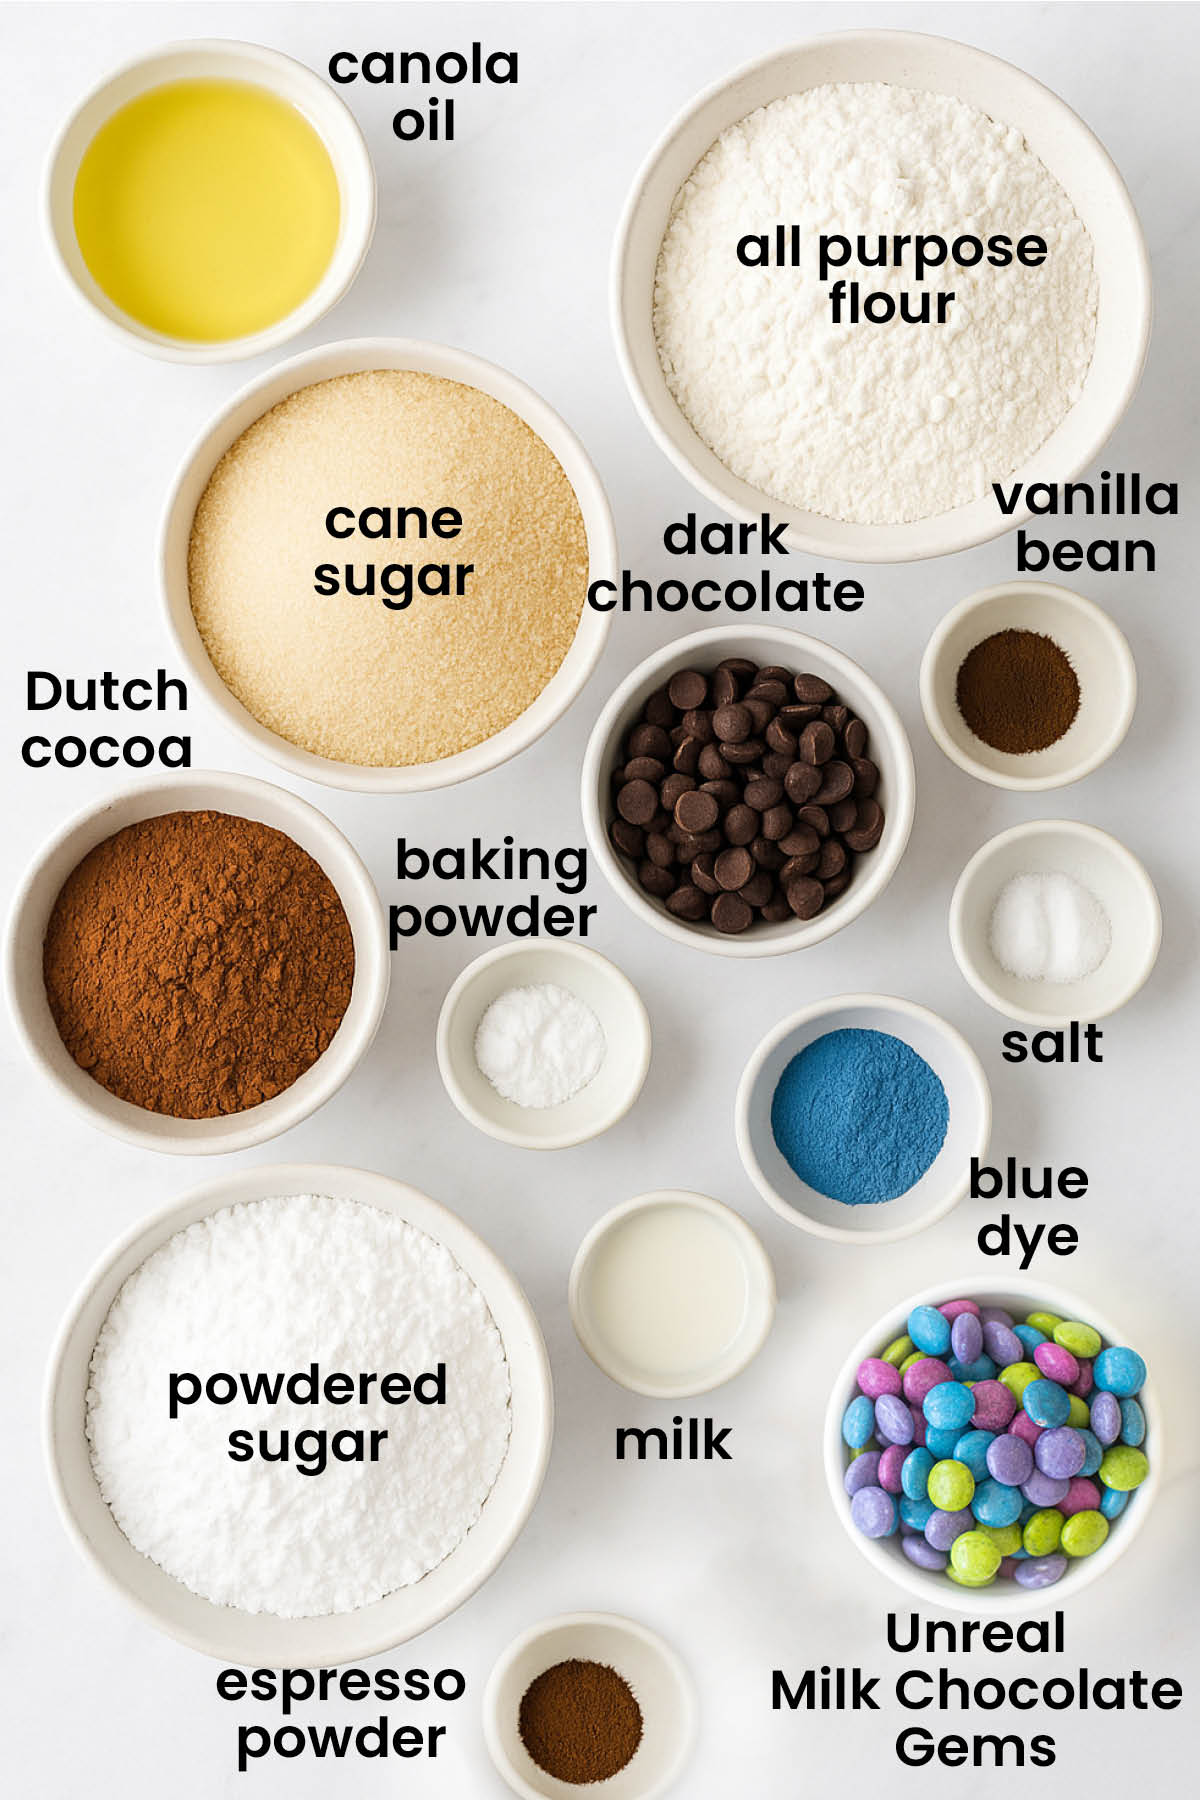
- Canola Oil: I use organic canola oil because it's the most neutral flavored oil, perfect for brownies. If you are avoiding seed oils, feel free to use EVOO or avocado oil in its place.
- Dark Chocolate: You can use organic dark chocolate chips or a chopped up chocolate bar, either work!
- Espresso Powder: I add a little organic espresso powder for flavor. You can leave this out if you're baking these for kids.
- Vanilla Bean: I use organic ground vanilla bean as I love the depth of flavor this has, especially with chocolate and espresso! If you don't have this, you can also use vanilla extract.
- Baking Powder: I use baking powder, because these are made with Dutch cocoa powder. Fore more info on leavening agents, check out Difference Between Baking Soda and Baking Powder.
- Milk: You can use any kind of milk you like, cow's milk, coconut, oat, or almond all work.
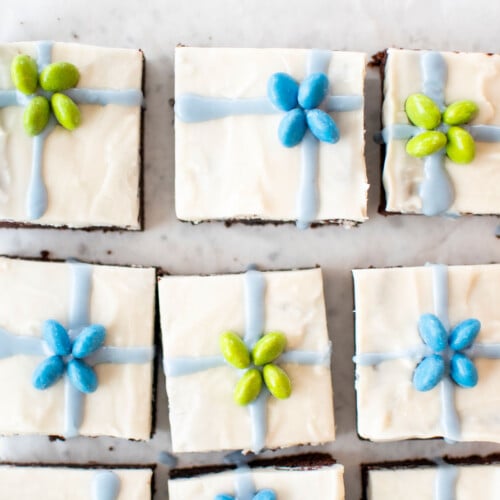
- Blue Dye: I use Suncore Foods Organic Blue Dye for natural colored blue ribbon. You can use any color for the ribbon. Also, using organic matcha powder will give you a pretty green ribbon, which is also super festive!
- Chocolate Candy: I use Unreal Milk Chocolate Gems for the bows, which have no artificial colors!
*For a full list of ingredients and measurements, visit the recipe card below.
Baker's Tips
- Always weigh ingredients for the best results.
- I use dark chocolate chips in this recipe, but if you want to chop a chocolate bar, you can do that as well, just be sure to chop it up. You can even use milk chocolate if you prefer.
- Once the boiling water is added to the chocolate, it’s time to work quickly. This will melt the chocolate chips and once they are melted you should immediately add in the dry ingredients. The water will begin to cool as soon as it’s added, making the batter stiffer. This is why it’s important to work quickly and don’t leave these brownies at this stage as it will just be more difficult to spread them out into the pan.
- If you want to omit the espresso powder, you can definitely do that. I would suggest doing this if you are baking these with or for kids. I wouldn’t want to give kids under my watch espresso, haha!
- If you don’t have parchment paper or don’t want to use it, be sure to grease the pan well! You can do this with a little canola oil or canola oil spray.
- If you are omitting espresso powder for kids, you can add a little peppermint extract to the white icing for a mint chocolate brownie. If you’d like to do that, add ½ teaspoon to the white icing and you’ll have a festive minty brownie that both kids and adults will love!
- I used milk in the icing, but if you want to omit dairy you can use water, coconut milk, or any other nondairy milk of your choice! That would also make these brownies vegan as well if you changed the milk. You’d just have to use a vegan candy for the bow, like Unreal Dark Chocolate Quinoa Gems.
- I chose to use blue dye for the ribbon, but you can pick any color you want! Same goes for the bow on top, I chose blue and green milk chocolate gems, but you can use any color you like.
- Gluten Free – Replace the all-purpose flour with a scant 212 grams (1 ⅓ cups) gluten free flour blend.
- Vegan – Replace the milk with coconut milk and the milk chocolate gems with Dark Chocolate Quinoa Gems.
- High Altitude — Bake at 350°F for 18 to 23 minutes, or until a toothpick inserted in the center comes out clean.
How to Make Easy Christmas Present Brownies
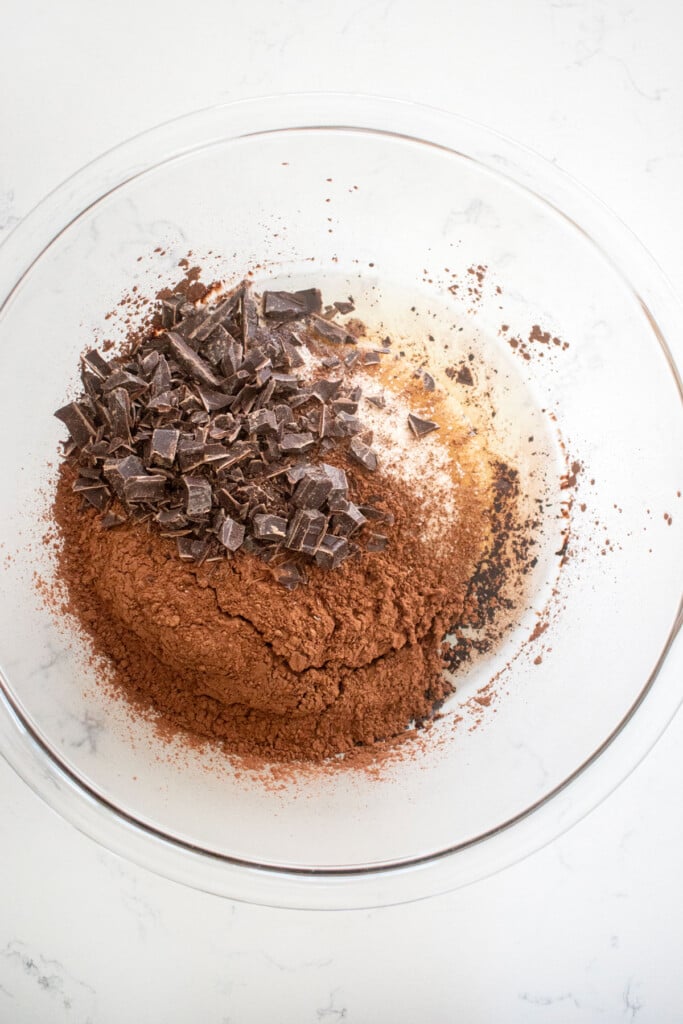
- Preheat the oven to 350°F. Line a 9×9-inch baking pan with parchment paper. To make the batter: In the bowl of a stand mixer fitted with the paddle attachment (or using a hand mixer or even just a bowl with a whisk), add the canola oil, cane sugar, cocoa powder, and dark chocolate chips.
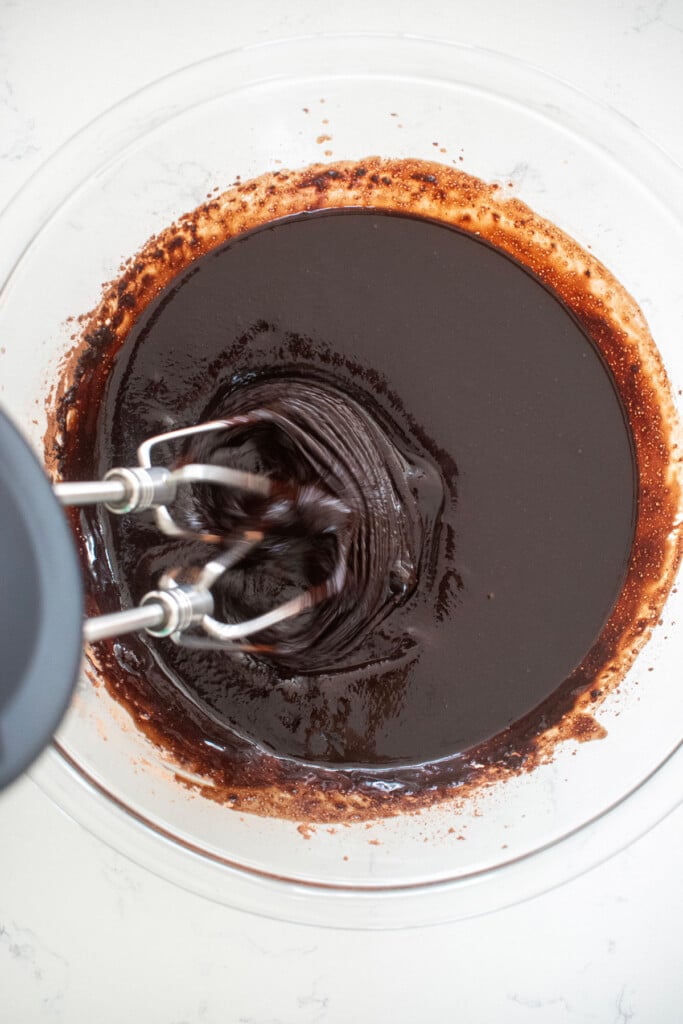
- Pour the boiling water directly on top of the chocolate chips and mix on low on until combined and the chocolate has completely melted and there are no chunks.
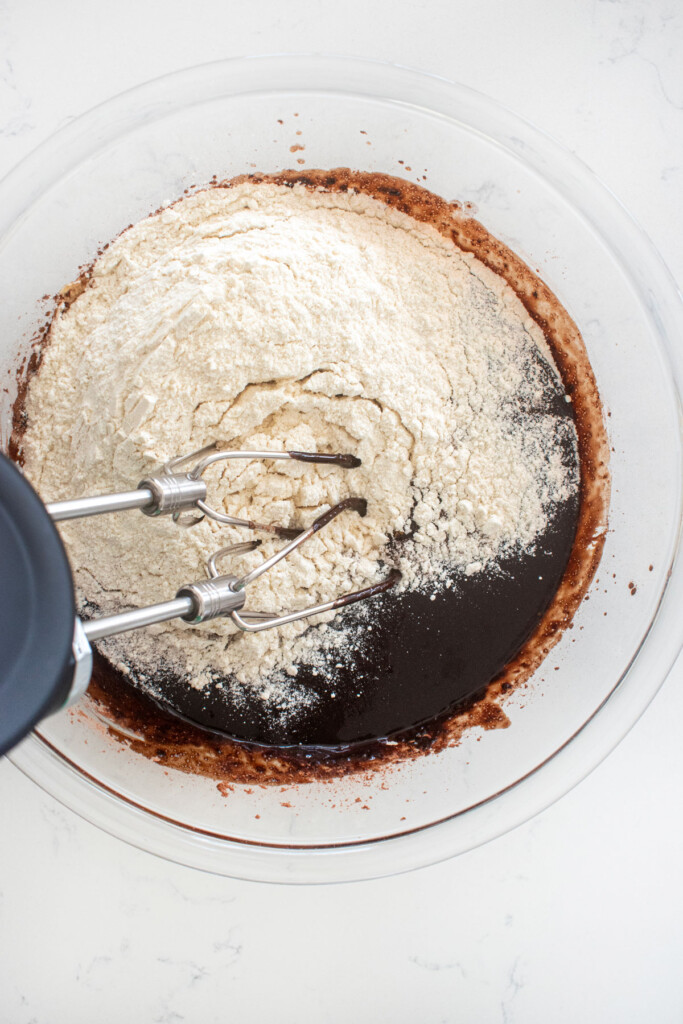
- Add flour, espresso powder, vanilla bean, baking powder, and sea salt in that order.
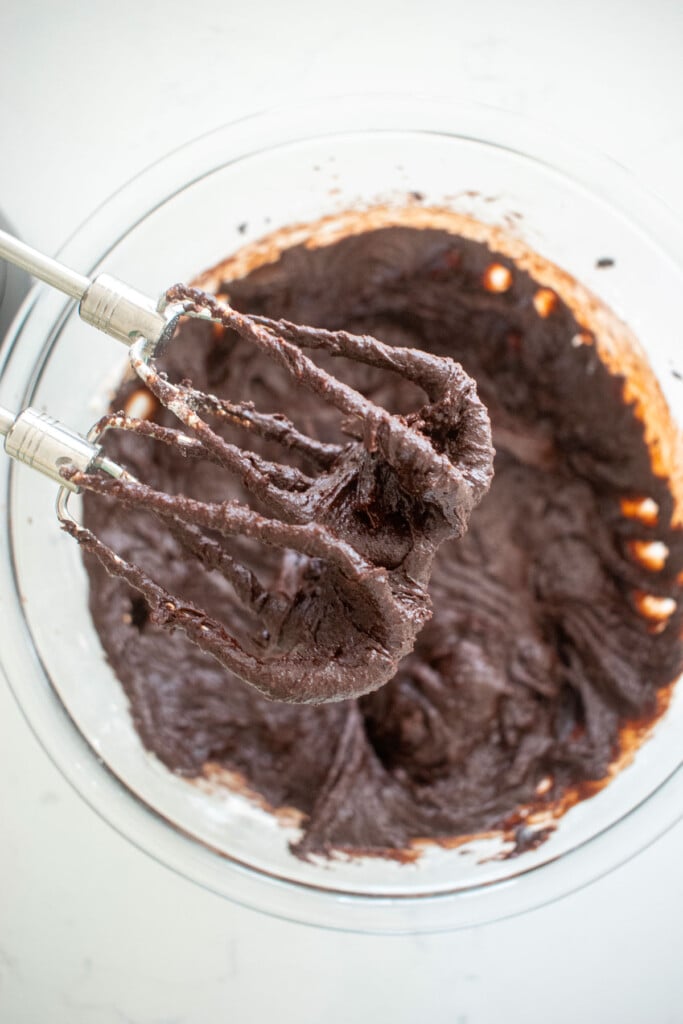
- Mix on low until combined, do not over mix.
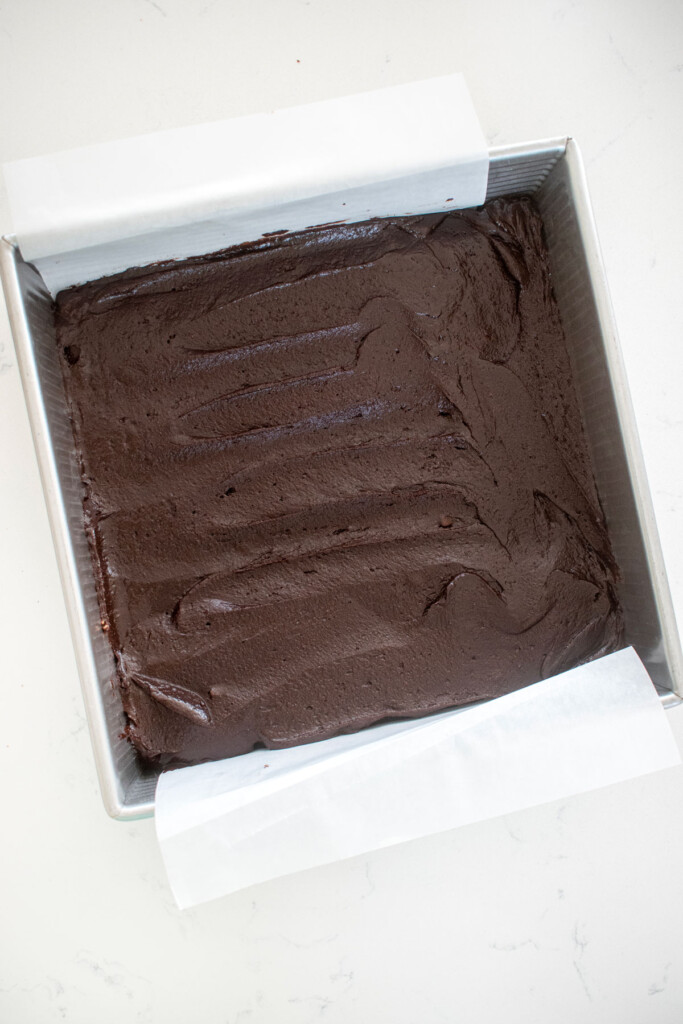
- Transfer to the prepared pan and spread evenly.
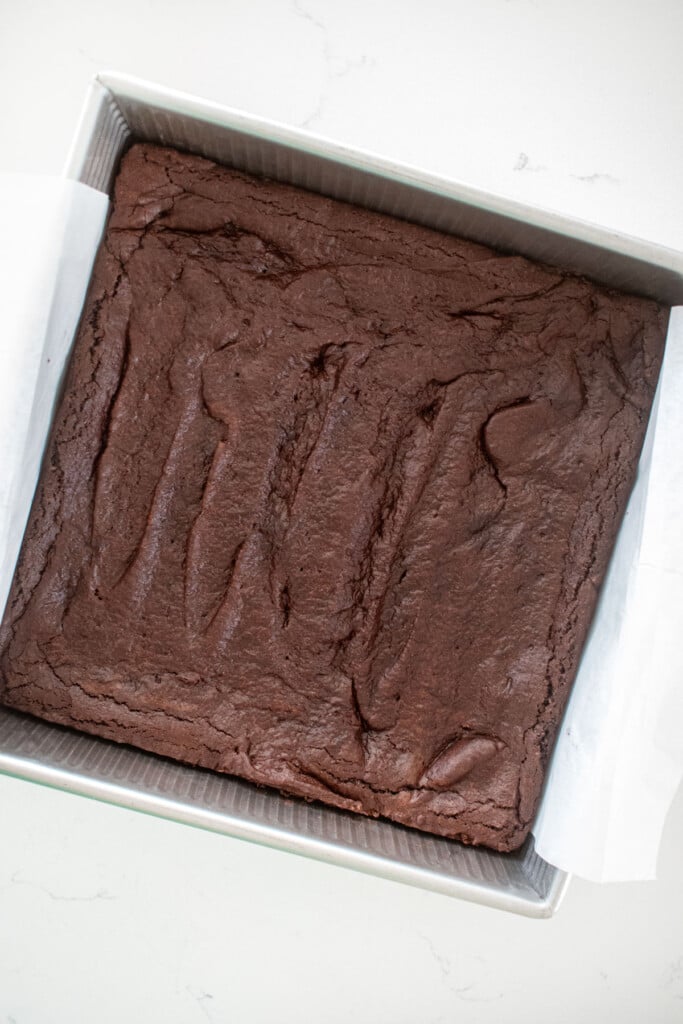
- Bake for Bake for 20 to 25 minutes, or until a toothpick inserted in the center comes out clean. Allow to completely in the baking pan.
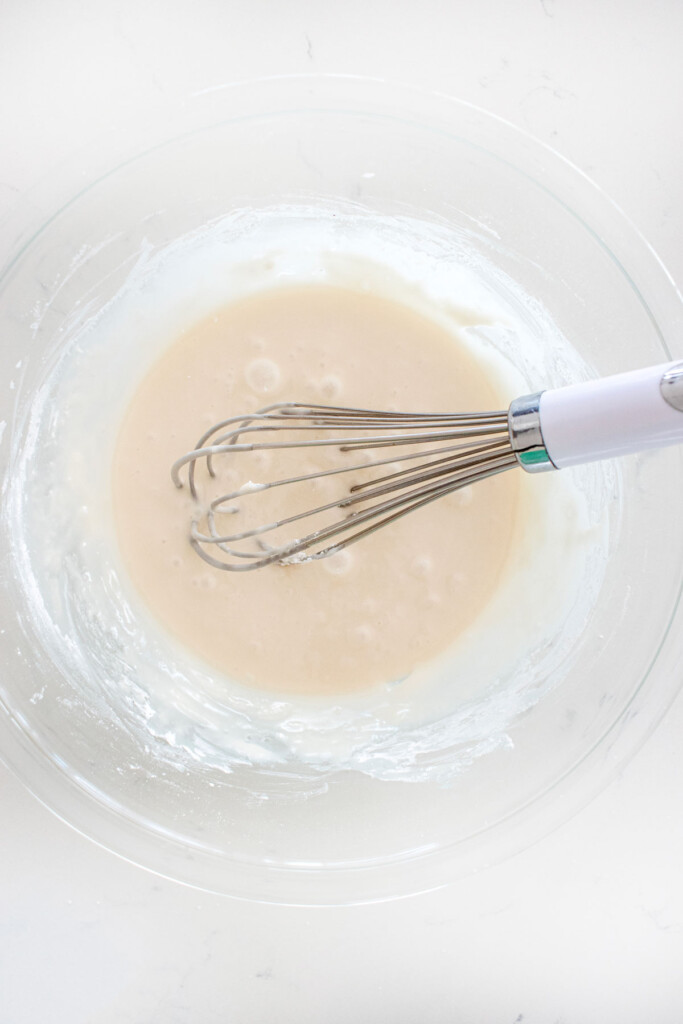
- To make the white icing: In the bowl of a stand mixer fitted with the paddle attachment, add the powdered sugar and milk. Whisk on low until combined into a smooth icing.
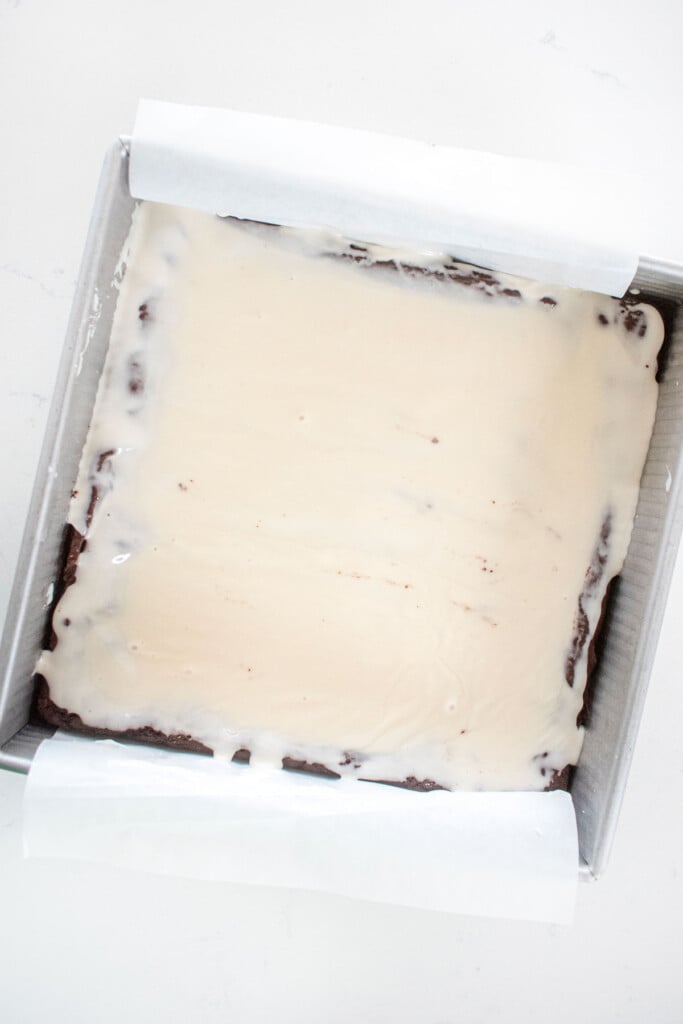
- Spread the white icing over the top of the brownies. Place the brownie tray in the freezer for 15 to 30 minutes to set the icing.
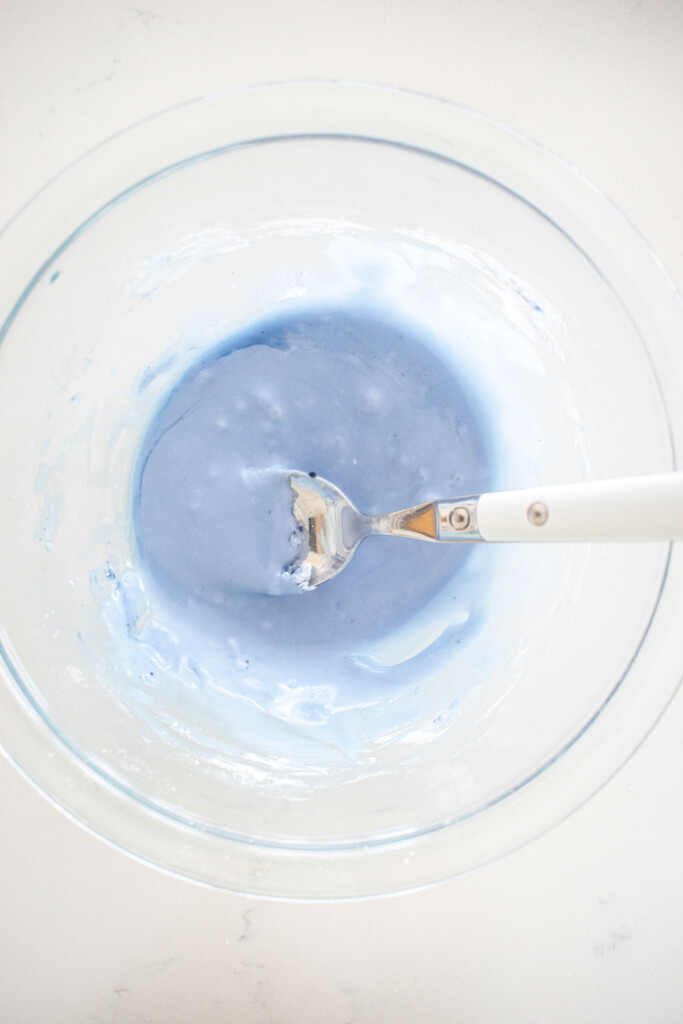
- To make the blue icing: In a small bowl, add the powdered sugar, water, and blue dye and whisk together. Transfer to a piping bag with Ateco tip #6.
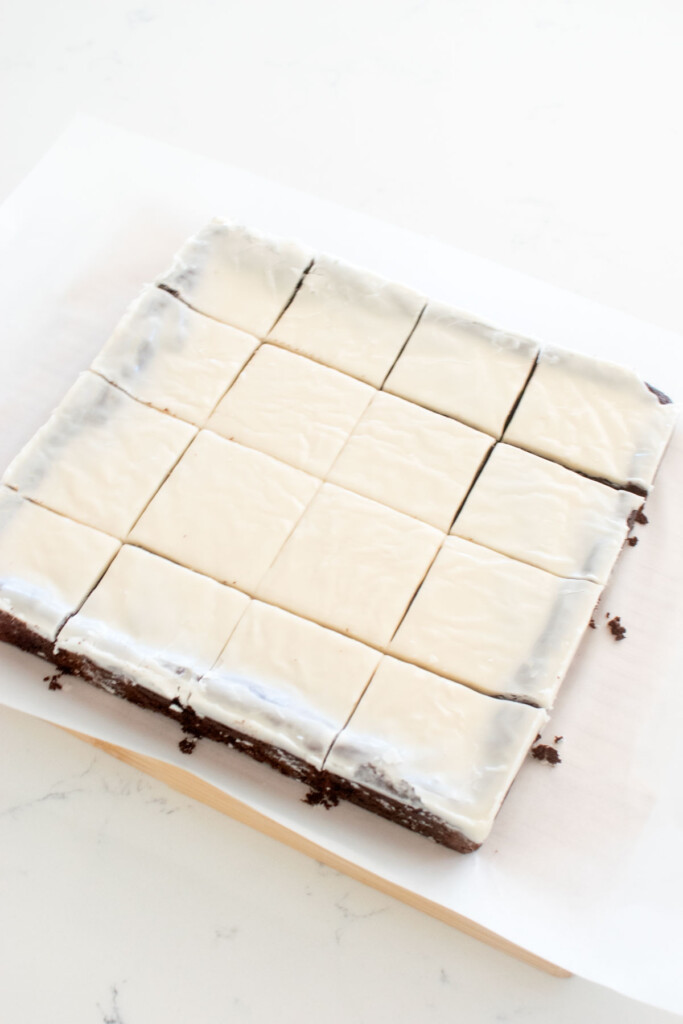
- Remove brownies from the freezer and cut into 16 squares (4 x 4).
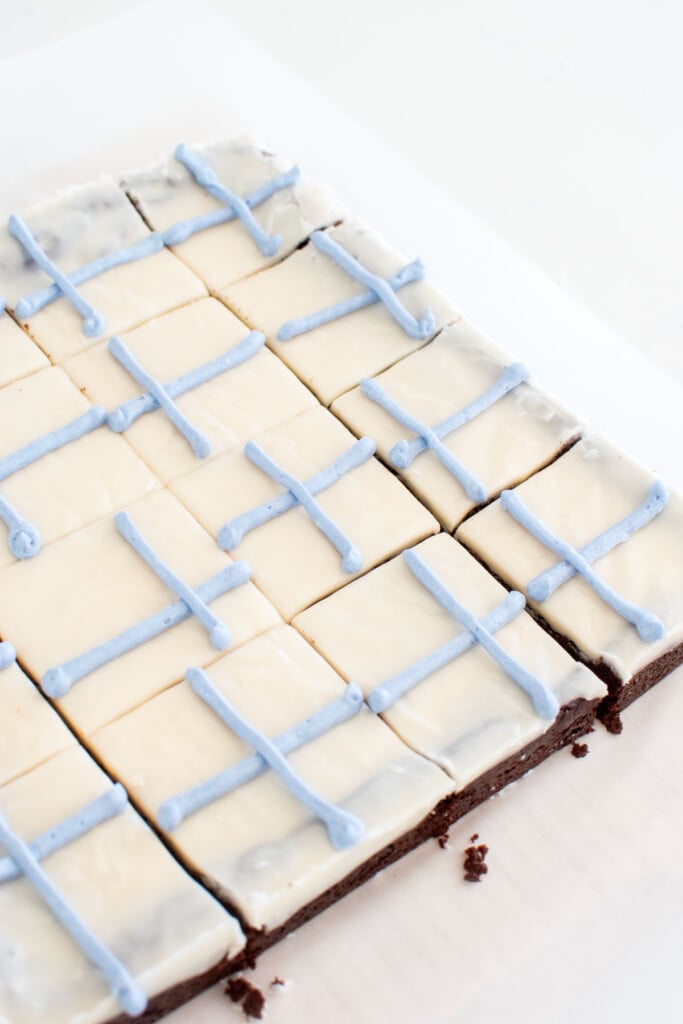
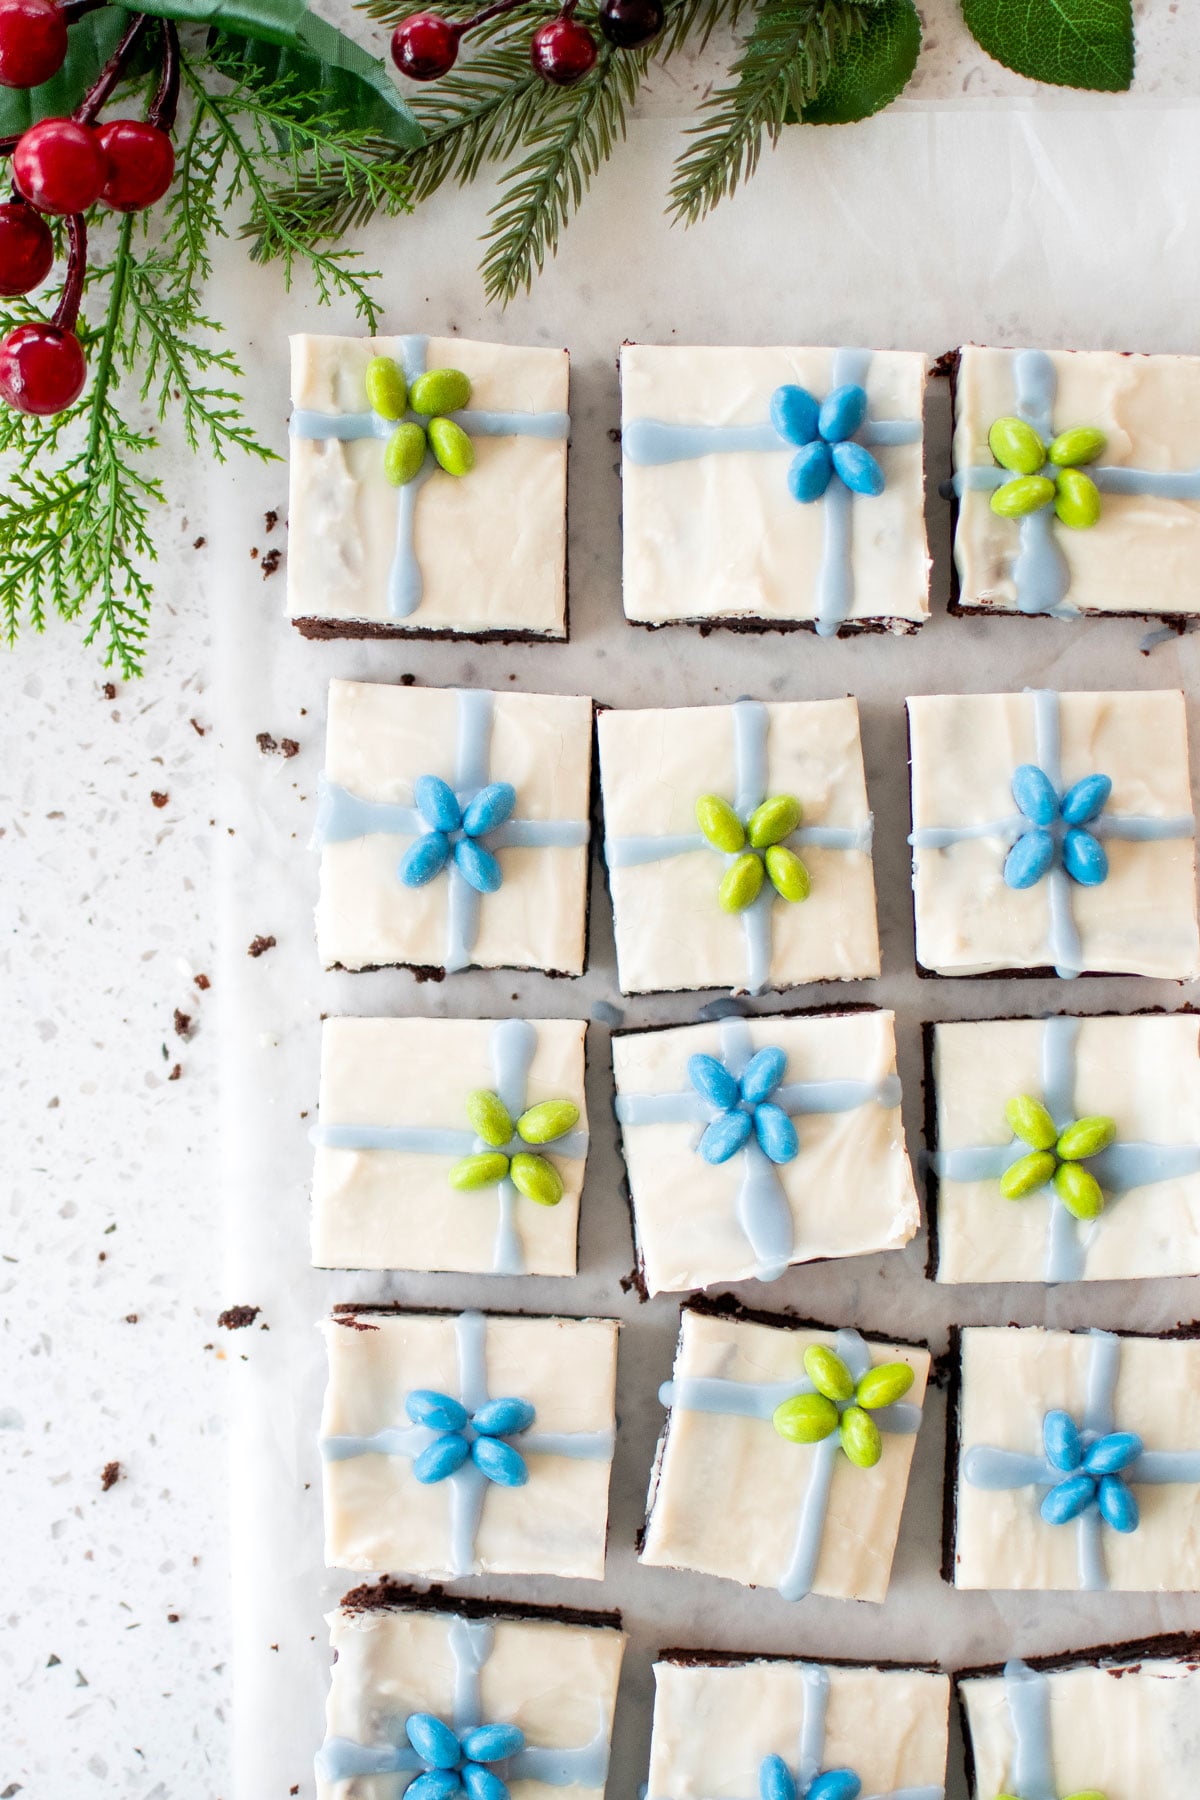
- Pipe a cross onto the top of each brownie. You can do this so the “ribbon” of icing crosses in the middle or some on the side (see my photos as I did both!).
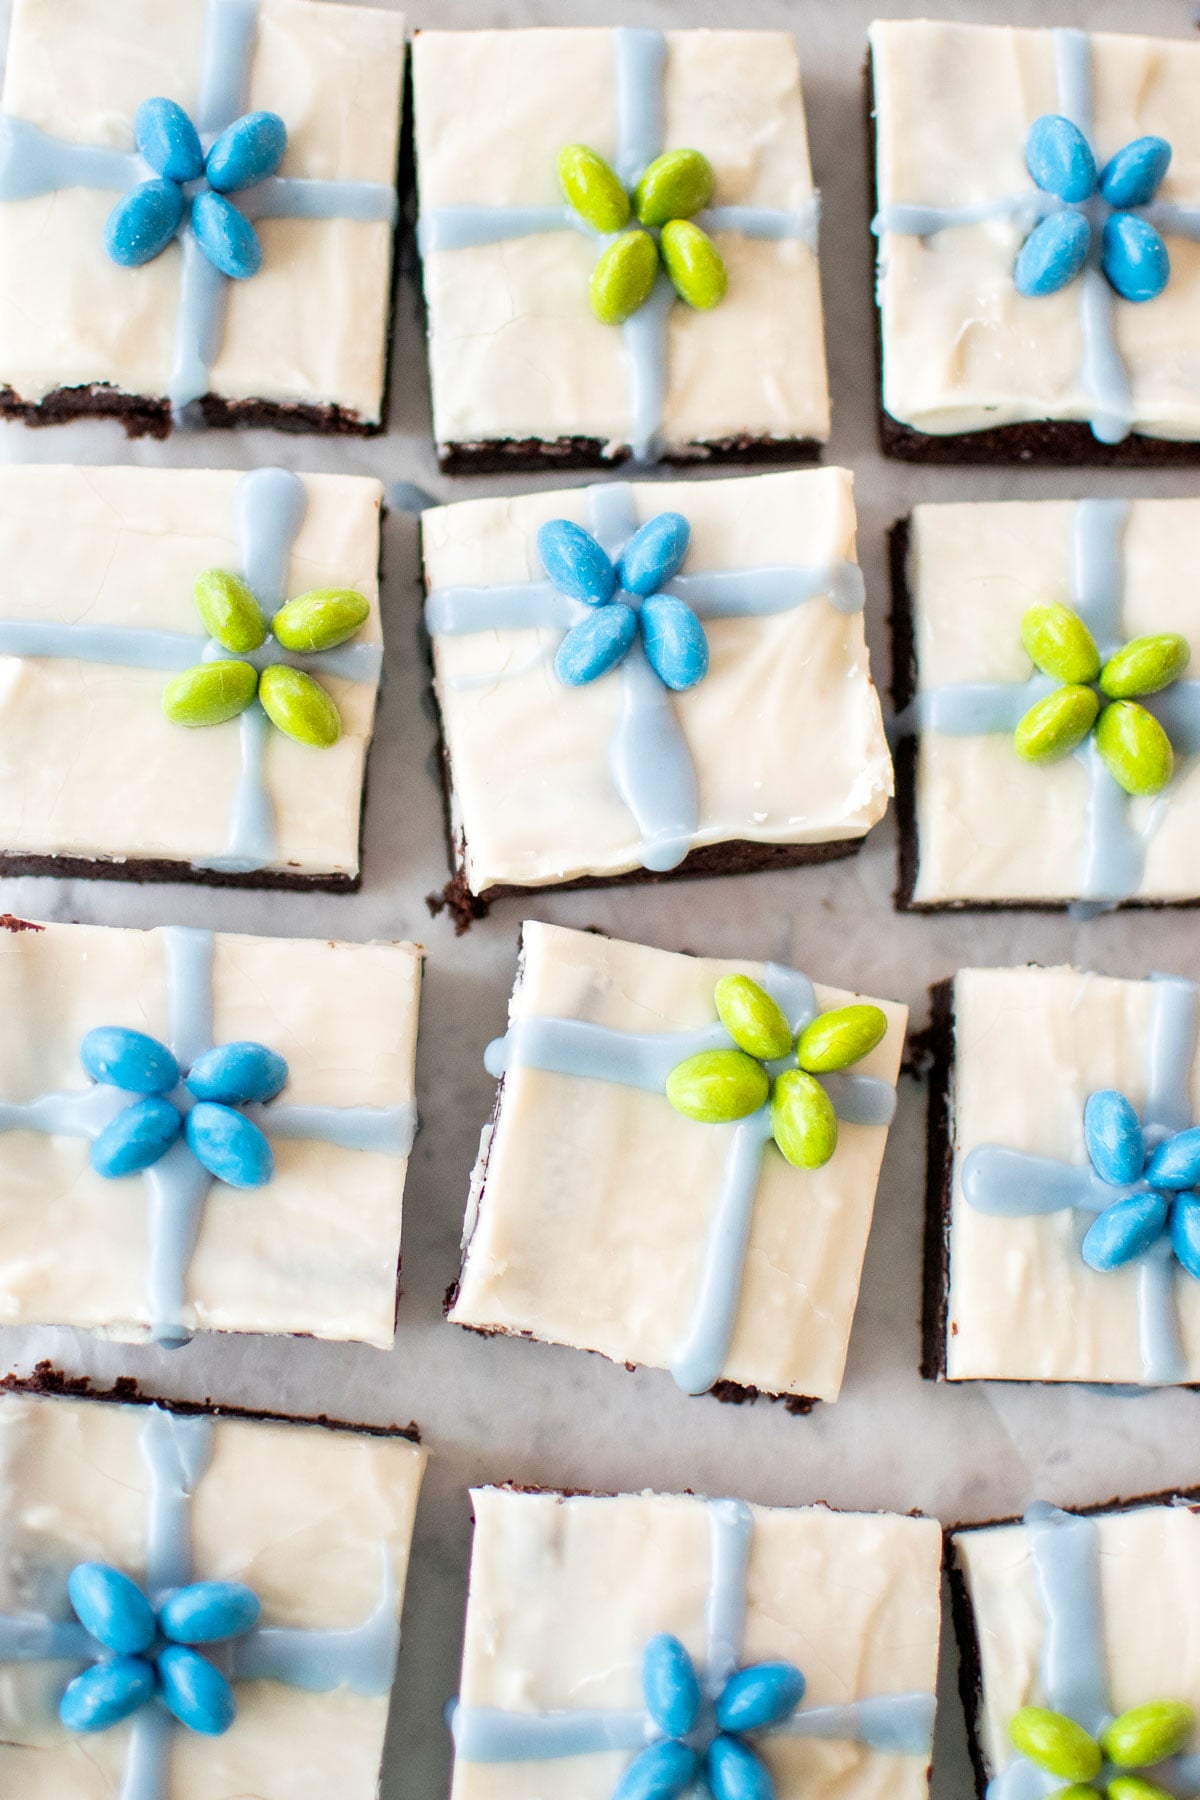
- Place chocolate gems in the shape of a bow in the center of each ribbon cross.
Recipe FAQ's
I use plant based dyes to color the frosting. I use a butterfly pea powder for light blue for the ribbon here, but you can use other colors. If you want green, use match powder. If you want pink, use beet powder.
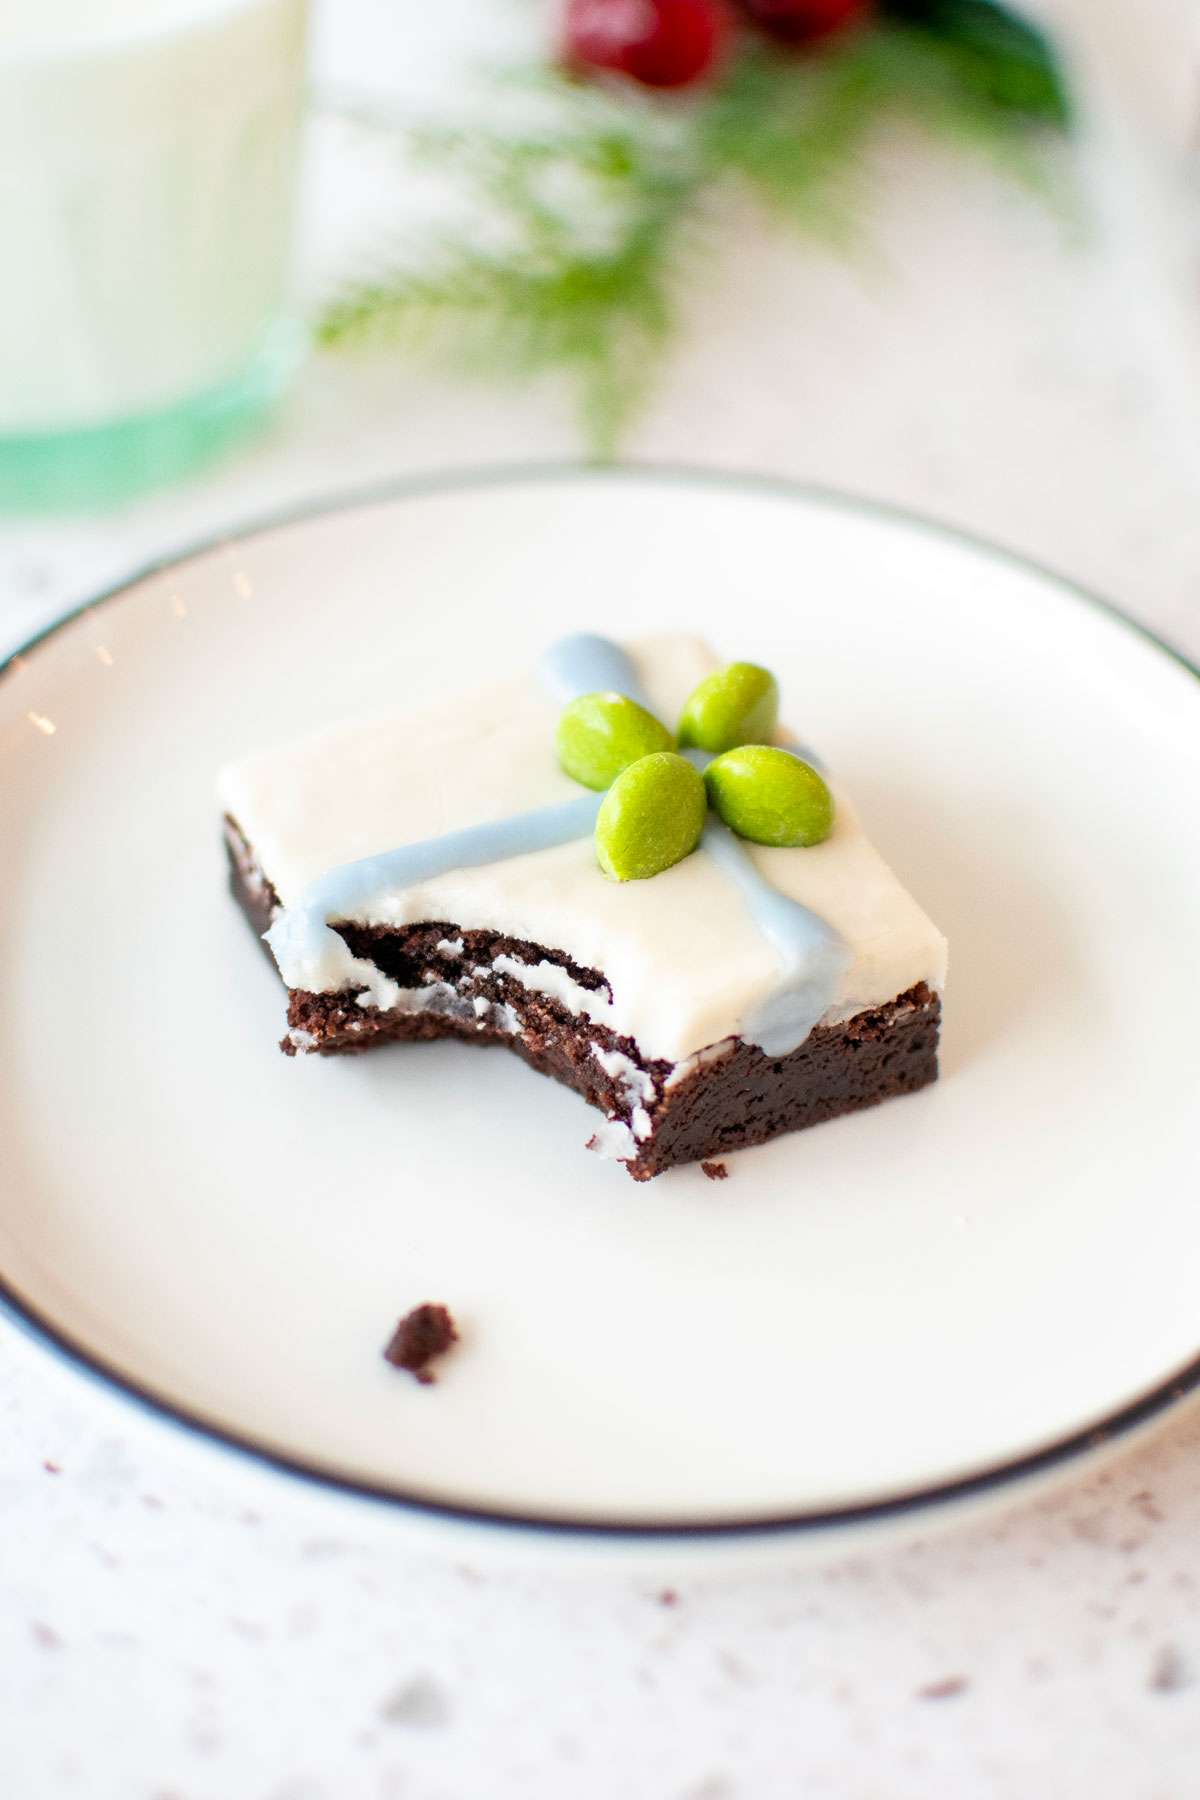
Chocolate and oil makes these brownies work without eggs and they are super fudgy!
Yes, the most common thing you'll usually notice with eggless brownies as they are usually very flat where brownies with eggs can have an uneven top because the eggs make them rise more. So, that makes these brownies perfect for decorating as presents because they are very flat.
Espresso powder enhances the chocolate flavor and makes these brownies so tasty! You can leave it out if you are baking for kids.
Yes! You can replace the all-purpose flour with a scant 212 grams (1 ⅓ cups) of gluten free flour blend, I used Namaste Organic Perfect Flour Blend for testing. I can't say what will happen if you use another blend.
Yes! If you want to make these vegan, replace the milk in the icing with coconut milk or water. And you’ll need to replace the Unreal Milk Chocolate Gems with a vegan option. You can use Unreal Dark Chocolate Quinoa Gems.
Yes, you can switch up the colors to whatever you like. You can even color the white frosting if you want a colored “wrapping paper” below. You can change the color of the ribbon and use different color candies.
Yes! You can make the brownies ahead of time and then just decorate them the following day! To do this, just bake the brownies and then make the white icing and cover the brownies. The white icing will seal in the brownies in the pan, so they won’t dry out. Then the following day you can pop them out, cut them, and decorate!
If you over bake or use too much flour. Be sure to use a digital food scale for perfect brownies every time!
Yes, brownies will be soft in the center when you pull them out of the oven. To test if they are done, brownies should have a few moist crumbs when you poke the center with a toothpick. If it's super wet with batter, they are not done. If it's too clean, they may be over baked.
Too much milk or not enough powdered sugar. You can easily fix this by adding more powdered sugar if your icing is to runny or adding more milk if it's too thick. You can do that to get your desired consistency.
Not enough liquid, you can add in a little more water to get desired consistency.
Yes, be sure to let brownies cool completely before icing so it doesn't just melt into the brownies.
You can pop the brownies in the freezer for about 15 to 20 minutes before slicing. This will ensure you get nice clean cuts.
These brownies are soft and chewy, so they need to be stored in an airtight container, so they don’t dry out. I prefer to do this in a Tupperware or cake dome as these are truly airtight. If you don’t have either of those, a zip bag is the next best option. And then plastic wrap.
Ways to Enjoy Easy Christmas Present Brownies
- Perfect with hot cocoa like Caramel Hot Cocoa, Bone Broth Hot Cocoa, or Coconut Hot Chocolate if you are making these vegan, this cocoa is vegan friendly!
- Leave out for Santa with the classic Creamy Dark Hot Chocolate With Homemade Whipped Cream.
- Indulge in dessert and cocktails like Boozy Pumpkin Spice Hot Chocolate or Sparkling Apple Cider Bourbon, perfect for a holiday cocktail party.
- Add into DIY Christmas Cookie Box along with cookies!

More Christmas Dessert Recipes


Loved it? Tell us!
Thanks a waffle lot for stopping by 🧇 If you loved this recipe, sprinkle some love by leaving a ⭐⭐⭐⭐⭐ review — it inspires others to try this recipe and helps me organically reach dog loving foodies like you! I personally read and appreciate every message!
Also, be sure to subscribe to our YouTube channel and join John John and me in the kitchen for step by step recipe videos! And subscribe to our newsletter for new and seasonal recipes!
Easy Christmas Present Brownies
Equipment
- Digital Food Scale
- Hand Mixer (or stand mixer)
- Mixing Bowl
- 9×9-inch Baking Pan
- Parchment Paper Sheets
- Piping Bags
- Ateco Tip #6
Ingredients
Batter
- 113 grams canola oil
- 226 grams cane sugar
- 57 grams Dutch cocoa powder
- 57 grams dark chocolate chips
- ½ cup boiling water
- 212 grams all purpose flour
- 1 teaspoon espresso powder
- ½ teaspoon baking powder
- ½ teaspoon fine sea salt
White Icing
- 284 grams powdered sugar (sifted)
- scant ¼ cup milk
Blue Icing
- 71 grams powdered sugar (sifted)
- 1 tablespoon water
- ⅛ teaspoon Suncore Foods Organic Blue Dye
Topping
- ½ cup Unreal Milk Chocolate Gems
Instructions
- Preheat the oven to 350°F. Line a 9 x 9-inch baking pan with parchment paper.
- To make the batter: In the bowl of a stand mixer fitted with the paddle attachment (or using a hand mixer or even just a bowl with a whisk), add the canola oil, cane sugar, cocoa powder, and dark chocolate chips. Pour the boiling water directly on top of the chocolate chips and mix on low on until combined and the chocolate has completely melted and there are no chunks.
- Add flour, espresso powder, baking powder, and sea salt in that order. Mix on low until combined, do not over mix. Transfer to the prepared pan and spread evenly.
- Bake for Bake for 20 to 25 minutes, or until a toothpick inserted in the center comes out clean. Allow to completely in the baking pan.
- To make the white icing: In the bowl of a stand mixer fitted with the paddle attachment, add the powdered sugar and milk. Whisk on low until combined into a smooth icing.
- Spread the white icing over the top of the brownies. Place the brownie tray in the freezer for 15 to 30 minutes to set the icing.
- To make the blue icing: In a small bowl, add the powdered sugar, water, and blue dye and whisk together. Transfer to a piping bag with Ateco tip #6.
- Remove brownies from the freezer and cut into 16 squares (4 x 4).
- Pipe a cross onto the top of each brownie. You can do this so the “ribbon” of icing crosses in the middle or some on the side (see my photos as I did both!).
- Place chocolate gems in the shape of a bow in the center of each ribbon cross.
- Store in an airtight container for up to 3 days.
Video

Notes
- Always weigh ingredients for the best results.
- I use dark chocolate chips in this recipe, but if you want to chop a chocolate bar, you can do that as well, just be sure to chop it up. You can even use milk chocolate if you prefer.
- Once the boiling water is added to the chocolate, it’s time to work quickly. This will melt the chocolate chips and once they are melted you should immediately add in the dry ingredients. The water will begin to cool as soon as it’s added, making the batter stiffer. This is why it’s important to work quickly and don’t leave these brownies at this stage as it will just be more difficult to spread them out into the pan.
- If you want to omit the espresso powder, you can definitely do that. I would suggest doing this if you are baking these with or for kids. I wouldn’t want to give kids under my watch espresso, haha!
- If you don’t have parchment paper or don’t want to use it, be sure to grease the pan well! You can do this with a little canola oil or canola oil spray.
- If you are omitting espresso powder for kids, you can add a little peppermint extract to the white icing for a mint chocolate brownie. If you’d like to do that, add ½ teaspoon to the white icing and you’ll have a festive minty brownie that both kids and adults will love!
- I used milk in the icing, but if you want to omit dairy you can use water, coconut milk, or any other nondairy milk of your choice! That would also make these brownies vegan as well if you changed the milk. You’d just have to use a vegan candy for the bow, like Unreal Dark Chocolate Quinoa Gems.
- I chose to use blue dye for the ribbon, but you can pick any color you want! Same goes for the bow on top, I chose blue and green milk chocolate gems, but you can use any color you like.
- Gluten Free – Replace the all-purpose flour with a scant 212 grams (1 ⅓ cups) gluten free flour blend.
- Vegan – Replace the milk with coconut milk and the milk chocolate gems with Dark Chocolate Quinoa Gems.
- High Altitude — Bake at 350°F for 18 to 23 minutes, or until a toothpick inserted in the center comes out clean.
Nutrition
The Bake Shop
Visit The Bake Shop for foodie inspired tees, sweatshirts, and accessories. Find my favorite kitchen tools (with discounts!) in the Kitchen Shop. And shop our collection of food inspired dog accessories too!

Love these for a party!
Adorable and delicious
A Christmas favorite and so much better than the store bought brownies!