Coconut Cream Pie With Graham Cracker Crust
Silky, smooth, and thick coconut custard makes up this traditional Coconut Cream Pie With Graham Cracker Crust. it's topped with Homemade Whipped Cream for an old fashioned cream pie recipe that everyone will love.
If you love coconut as much as I do, check out some of my other favorite coconut recipes like Coconut Milk Chocolate Chunk Cookies, Vegan Toasted Coconut Brownies, Coconut Chocolate Chip Banana Bread, or Honey Almond Coconut Granola.

A Quick Look At The Recipe
- Recipe Name: Coconut Cream Pie
- Ready In: 4 hours 40 minutes
- Makes: 9-inch pie
- Main Ingredients: egg yolks, cane sugar, all purpose flour, milk, coconut
- Flavor Profile: creamy coconut inside a buttery graham crust
- Difficulty: Medium
- Why You’ll Love It: coconut cream pie recipe I served at my bakery for over a decade
Summarize & Save This Content On
Why You'll Love This Recipe
- Nostalgic: Today I am sharing an oldie but goodie! I created this recipe for Coconut Cream Pie when I started my bake shop. So, if you were a customer then you know what I'm talking about. And now you can re-create this nostalgic dessert at home.
- Old Fashioned: I make a traditional old fashioned custard, using only the egg yolks, and flavor it with coconut extract. My favorite brand of organic coconut extract to use is Flavorganics. Not all coconut extracts are created equal, so make sure you find one that you like the flavor of. That is key to a good Coconut Cream Pie!
- Homemade Whipped Cream: I top this Coconut Cream Pie with homemade organic whipped cream. This is the only way to top a cream pie, in my opinion. This cold pie is the perfect dessert on a warm summer night.
If you were a customer at my bake shop, then this coconut cream pie is something you probably have had once or twice, or every time you stopped in! This organic pie was one of our best sellers and today I'm finally sharing the recipe with you!
This starts out with what I call “old fashioned” custard. I use only egg yolks to thicken the custard naturally, no cornstarch or any other stabilizers are used in this coconut cream pie! This takes a little more time than making a pudding pie, but that extra effort is totally worth it! If you want this coconut pie to taste just like it did at my bake shop, be sure to use the exact ingredients I list below as they really contribute to the flavor. So, if you're looking for nostalgia you'll find it right here!
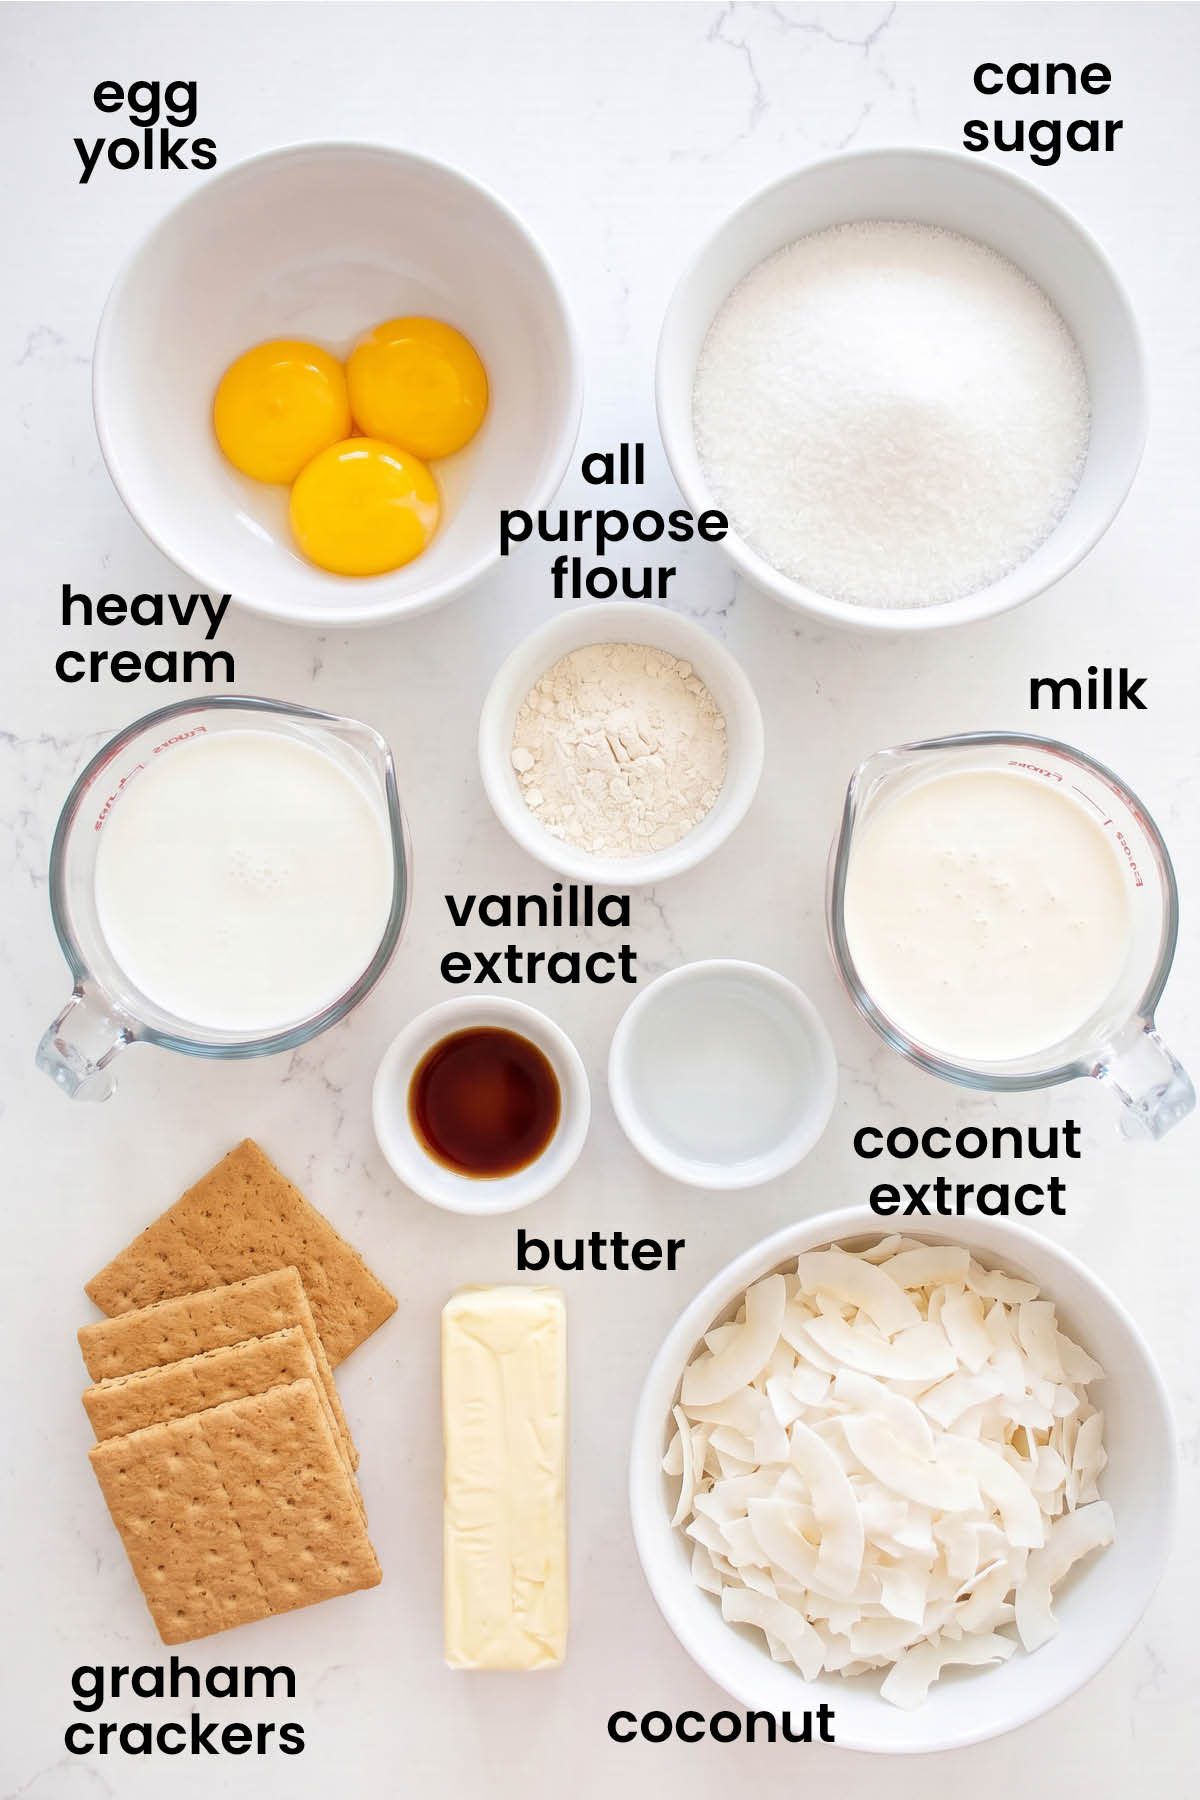
Ingredients
- Eggs: You'll need only the egg yolks. Be sure to use large eggs so you get the right size yolk. You can save the leftover egg whites in an airtight container in the fridge and use them for recipes like Green Tea French Macarons, Chocolate Malt French Macarons, or Strawberry French Macarons Without Food Coloring.
- Cane Sugar: You'll need organic cane sugar, which is less processed than granulated white sugar. We always used Wholesome at my bake shop.
- Milk: Use organic whole milk for the best results, Organic Valley, Alexandre Family Farms, or Straus are all great options and what we used at my bake shop.
- All Purpose Flour: Use Cairnspring Mills.
- Butter: I use organic salted butter, which is how we made this at my bakery. If you are using unsalted butter, just be sure to add a little pinch of salt to the custard when stirring in the butter. And, I use softened butter for the graham cracker crust, you should not melt butter for this. Using softened butter, as opposed to melted butter in graham cracker crust will give you a much better texture, as well as a pie that slices easier. The melted butter will make graham cracker crust greaser and more crumbly, which is not ideal. This is something we tested at my bakery!
- Coconut Extract: Not all coconut extract is created equal, some are terrible, while others are amazing. I recommend Flavorganics, which is what we used at my bake shop. This is essential to get that stronger coconut flavor inside the custard.
- Heavy Whipping Cream: I use heavy cream for the homemade whipped cream for the top of the pie. We also use this homemade whipped inside the homemade coconut cream pie to make the custard more fluffy and give it the best texture!
- Vanilla Extract: Use a high quality vanilla extract, this really matters for homemade whipped cream. We always used Simply Organic.
- Graham Crackers: Annie's Organic Honey Graham Crackers are what we used at my bake shop and what I recommend for the best tasting crust!
*For a full list of ingredients and measurements, visit the recipe card below.
Baker's Tips
- Always weigh ingredients for the best results.
- If you don't have a stand mixer, a hand mixer also works for this recipe too.
- Always use a high heat spatula when making custard. This is important because you are stirring for an extended period of time over a high heat. If you're not using a high heat spatula, you can warp or melt off a piece of your spatula inside the custard (I know from experience!).
- If your custard is looking lumpy, stir vigorously to remove clumps while on the heat.
- If you find small brownish/red specs in your custard, this means you burned it as this is burnt custard pieces from the bottom of the pot. If there's just a few, you can remove the specs from custard and it's all good. But, if there's a lot that may be too much work and it won't taste great.
- Make sure to store leftovers in an airtight container in the fridge so it doesn't dry out.
How to Make Coconut Cream Pie With Graham Cracker Crust
Step 1
In a small saucepan, add the milk and heat over medium-high heat until it reaches 140°F on a drink thermometer. If you don’t have a drink thermometer, ensure the milk does not boil. If it boils it will burn and the burnt flavor will transfer into your custard.
In the bowl of a stand mixer fitted with the whisk attachment, add the egg yolks and cane sugar. Whisk on low for 2 to 3 minutes or until lightened in color.
Add in the flour and whisk to combine completely.
Once the milk has heated, turn the mixer on low and slowly add in the warm milk into the egg mixture. Once completely combined, stop the mixer.
Step 2
In a clean medium saucepan (do not use the one the milk was heated in, incase milk stuck to the bottom, that will burn if used without washing), pour in the egg mixture. Put over low/medium heat.
Continue to heat while continuously stirring with a high heat spatula by scraping the bottoms and the sides. The mixture will start to rise and may bubble, continue to stir. The mixture will start to thicken, and continue to stir. The trick is to keep stirring so clumps do not form, as you want a smooth custard. If you see clumps beginning to form, stir vigorously and they will dissolve.
Continue to stir until the custard coats the spatula and does not drip off when you lift it from the pot. You can also check this by scraping the custard in the center of the pot and ensuring that it doesn’t run back in. We just want a thick custard.
Step 3
Add in the butter and coconut extract to the custard, and stir to combine completely. Transfer to a medium bowl and place in the refrigerator for at least 4 hours or overnight (no need to cover it).
Step 4
Preheat the oven to 350°F.
To make the crust: In a food processor, add the graham crackers, butter, and cane sugar. Pulse, and then mix the graham cracker crumbs until you have a uniform mixture and fine crumbs and there are no chunks of graham cracker or butter in the crumb mixture.
Grease a 9-inch pie pan with butter. Transfer the graham cracker mixture to the pie pan, and lightly press it to the sides first. Use the remaining crust, and press it down into the bottom of the pan.
Bake for 5 minutes or until lightly golden brown. Allow to cool completely.
Step 5
To assemble the pie: In the bowl of a stand mixer fitted with the paddle attachment, add the heavy whipping cream, cane sugar, and vanilla extract. Mix on low and gradually increase the speed as the whipped cream starts to thicken, until you are full speed. Whisk until stiff peaks form.
Reserve half of the whipped cream (8 ounces or about 1 cup) for the topping and set aside. Add in about half (4 ounces) of the remaining whipped cream and fold to combine, then add in the other half (4 ounces) of the remaining whipped cream and the wide flake coconut, and fold to combine completely. It helps to add in half at a time so you don’t break the whipped cream when folding into the cold custard.
Transfer the coconut cream mixture to the cool crust, and spread evenly. Top with the remaining 8 ounces of whipped cream. Sprinkle a few extra coconut flakes on top for garnish (optional).

Recipe FAQ's
Yes, a hand mixer will work in place of a stand mixer if you prefer. I just think the stand mixer is much faster and easier!
Yes, this is a great pie to make ahead of time as the custard has to chill before you can put the pie together. The custard can sit in the fridge for 24 to 48 hours so you can even prep it two days in advance if you like. The whipped cream topping is best when it's fresh, so I always recommend putting the pie together as close to when you're serving as possible. If you do prep the pie the day before, you need to be sure to cover it tightly with plastic wrap. Once the custard is made and put in the pie crust, it can dry out if it's not covered.
This is an old fashioned custard, thickened naturally using egg yolks and flour. Both of these ingredients combined together will thicken the custard, so there's no need for cornstarch. This also gives this custard a smoother, more velvety mouthfeel as opposed to a pudding that's made with cornstarch or gelatin which can be more wobbly or jiggly, to give you an idea of texture and how it differs. This way is so much better!
Yes, you absolutely can! This was just how we made it my bakery since we were making very large batches of the base custard and then flavoring it after it was made, so we used whole milk so we could do different flavors. But, this will totally work with coconut milk for added coconut flavor.
While you can, you'll just end up with a vanilla custard. This coconut custard gets it flavor from the coconut extract, it's essential to get that concentrated coconut flavor in the pie.
If you don't cook it on a high enough heat or for long enough, then it won't thicken. We're relying on egg yolks only to thicken this custard, so it needs to be cooked in order to thicken because it won't set into a thicker consistency such as a pudding would that contains a thickening agent like cornstarch.
If you don't stir it consistently or you leave it on the heat and walk away, then your custard will definitely become lumpy. Because this egg yolk based custard is cooking down, you need to stir it consistently so it's smooth, otherwise the egg yolks will thicken and clump. If you are stirring and notice your custard is beginning to look lumpy, you can reduce the heat a little bit to help as well as stir vigorously to try to smooth and blend in those clumps, that should fix it if you catch it early enough!
If you didn't cook the custard long enough and it wasn't thick enough, then the pie can be runny. The pie will also be runny if you don't let the custard cool completely before assembling the pie, this step is crucial, so don't rush it.
The custard needs to chill for at least 4 hours or overnight, either will work. You just want to ensure that it's cooled completely. Because we're folding in homemade whipped cream into the custard, it needs to be completely chilled before doing that. If it's warm, it will melt the whiped cream and you'll have a sloppy mess instead of a thick and creamy custard.
Absolutely! If you want to toast the coconut before stirring it into the custard, you can do that at 350°F for about 5 minutes until lightly browned.
Cream pies need to be stored in the fridge because they are custard with whipped cream topping. Not only that, but they also need to be covered so they do not dry out. If you're storing the whole pie, cover it tightly with plastic wrap. If you are storing leftover slices, they can go in tupperware.
Yes, you can. You can freeze the finished pie by wrapping the entire pie in plastic wrap and storing in the fridge. It will last for 3 months. Just place in the freezer to thaw for 24 hours and then it's ready to serve. While you can do this, I don't recommend it for the best flavor and texture, because homemade whipped cream is just better when it's freshly made. If you want to prep in advance, you can make the custard and transfer it to an airtight container and freeze it for up to 3 months. Thaw that in the fridge for 24 hours and then just assemble the pie the day of. That will help with some of the prep work in advance, while giving you a better tasting pie if you need to plan ahead for a party.

More Pie Recipes
Loved it? Tell us!
Thanks a waffle lot for stopping by 🧇 If you loved this recipe, sprinkle some love by leaving a ⭐⭐⭐⭐⭐ review — it inspires others to try this recipe and helps me organically reach dog loving foodies like you! I personally read and appreciate every message!
Also, be sure to subscribe to our YouTube channel and join John John and me in the kitchen for step by step recipe videos! And subscribe to our newsletter for new and seasonal recipes!

Coconut Cream Pie With Graham Cracker Crust

Equipment
- Digital Food Scale
- Food Processor
- 9-Inch Pie Pan
- Stand Mixer
- 3-Quart Pot
- High Heat Spatula
- Drink Thermometer
- Mixing Bowl
Ingredients
Filling
- 1 cup milk
- 3 large egg yolks
- 226 grams cane sugar
- 57 grams all purpose flour
- 57 grams salted butter
- 1 teaspoon coconut extract
- 43 grams unsweetened wide flake coconut
Crust
- 204 grams honey graham crackers (crushed)
- 113 grams salted butter softened
- 71 grams cane sugar
Topping
- 2 cups heavy whipping cream
- 2 teaspoons cane sugar
- 1 teaspoon vanilla extract
Instructions
- In a small saucepan, add the milk and heat over medium-high heat until it reaches 140°F on a drink thermometer. If you don’t have a drink thermometer, ensure the milk does not boil. If it boils it will burn and the burnt flavor will transfer into your custard.
- In the bowl of a stand mixer fitted with the whisk attachment, add the egg yolks and cane sugar. Whisk on low for 2 to 3 minutes or until lightened in color.
- Add in the flour and whisk to combine completely.
- Once the milk has heated, turn the mixer on low and slowly add in the warm milk into the egg mixture. Once completely combined, stop the mixer.
- In a clean medium saucepan (do not use the one the milk was heated in, incase milk stuck to the bottom, that will burn if used without washing), pour in the egg mixture. Put over low/medium heat.
- Continue to heat while continuously stirring with a high heat spatula by scraping the bottoms and the sides. The mixture will start to rise and may bubble, continue to stir. The mixture will start to thicken, and continue to stir. The trick is to keep stirring so clumps do not form, as you want a smooth custard. If you see clumps beginning to form, stir vigorously and they will dissolve.
- Continue to stir until the custard coats the spatula and does not drip off when you lift it from the pot. You can also check this by scraping the custard in the center of the pot and ensuring that it doesn’t run back in. We just want a thick custard.
- Add in the butter and coconut extract to the custard, and stir to combine completely. Transfer to a medium bowl and place in the refrigerator for at least 4 hours or overnight (no need to cover it).
- Preheat the oven to 350°F.
- To make the crust: In a food processor, add the graham crackers, butter, and cane sugar. Pulse, and then mix the graham cracker crumbs until you have a uniform mixture and fine crumbs and there are no chunks of graham cracker or butter in the crumb mixture.
- Grease a 9-inch pie pan with butter. Transfer the graham cracker mixture to the pie pan, and lightly press it to the sides first. Use the remaining crust, and press it down into the bottom of the pan.
- Bake for 5 minutes or until lightly golden brown. Allow to cool completely.
- To assemble the pie: In the bowl of a stand mixer fitted with the paddle attachment, add the heavy whipping cream, cane sugar, and vanilla extract. Mix on low and gradually increase the speed as the whipped cream starts to thicken, until you are full speed. Whisk until stiff peaks form.
- Reserve half of the whipped cream (8 ounces or about 1 cup) for the topping and set aside. Add in about half (4 ounces) of the remaining whipped cream and fold to combine, then add in the other half (4 ounces) of the remaining whipped cream and the wide flake coconut, and fold to combine completely. It helps to add in half at a time so you don’t break the whipped cream when folding into the cold custard.
- Transfer the coconut cream mixture to the cool crust, and spread evenly. Top with the remaining 8 ounces of whipped cream. Sprinkle a few extra coconut flakes on top for garnish (optional).
Notes
- Always weigh ingredients for the best results.
- If you don't have a stand mixer, a hand mixer also works for this recipe too.
- Always use a high heat spatula when making custard. This is important because you are stirring for an extended period of time over a high heat. If you're not using a high heat spatula, you can warp or melt off a piece of your spatula inside the custard (I know from experience!).
- If your custard is looking lumpy, stir vigorously to remove clumps while on the heat.
- If you find small brownish/red specs in your custard, this means you burned it as this is burnt custard pieces from the bottom of the pot. If there's just a few, you can remove the specs from custard and it's all good. But, if there's a lot that may be too much work and it won't taste great.
- Make sure to store leftovers in an airtight container in the fridge so it doesn't dry out.
- High Altitude — Follow the recipe as noted.
Nutrition
The Bake Shop
Visit The Bake Shop for foodie inspired tees, sweatshirts, and accessories. Find my favorite kitchen tools (with discounts!) in the Kitchen Shop. And shop our collection of food inspired dog accessories too!

So classic and perfect, this coconut cream pie was a best seller at my bakery. It’s always a hit every time I bring it to a dinner party!