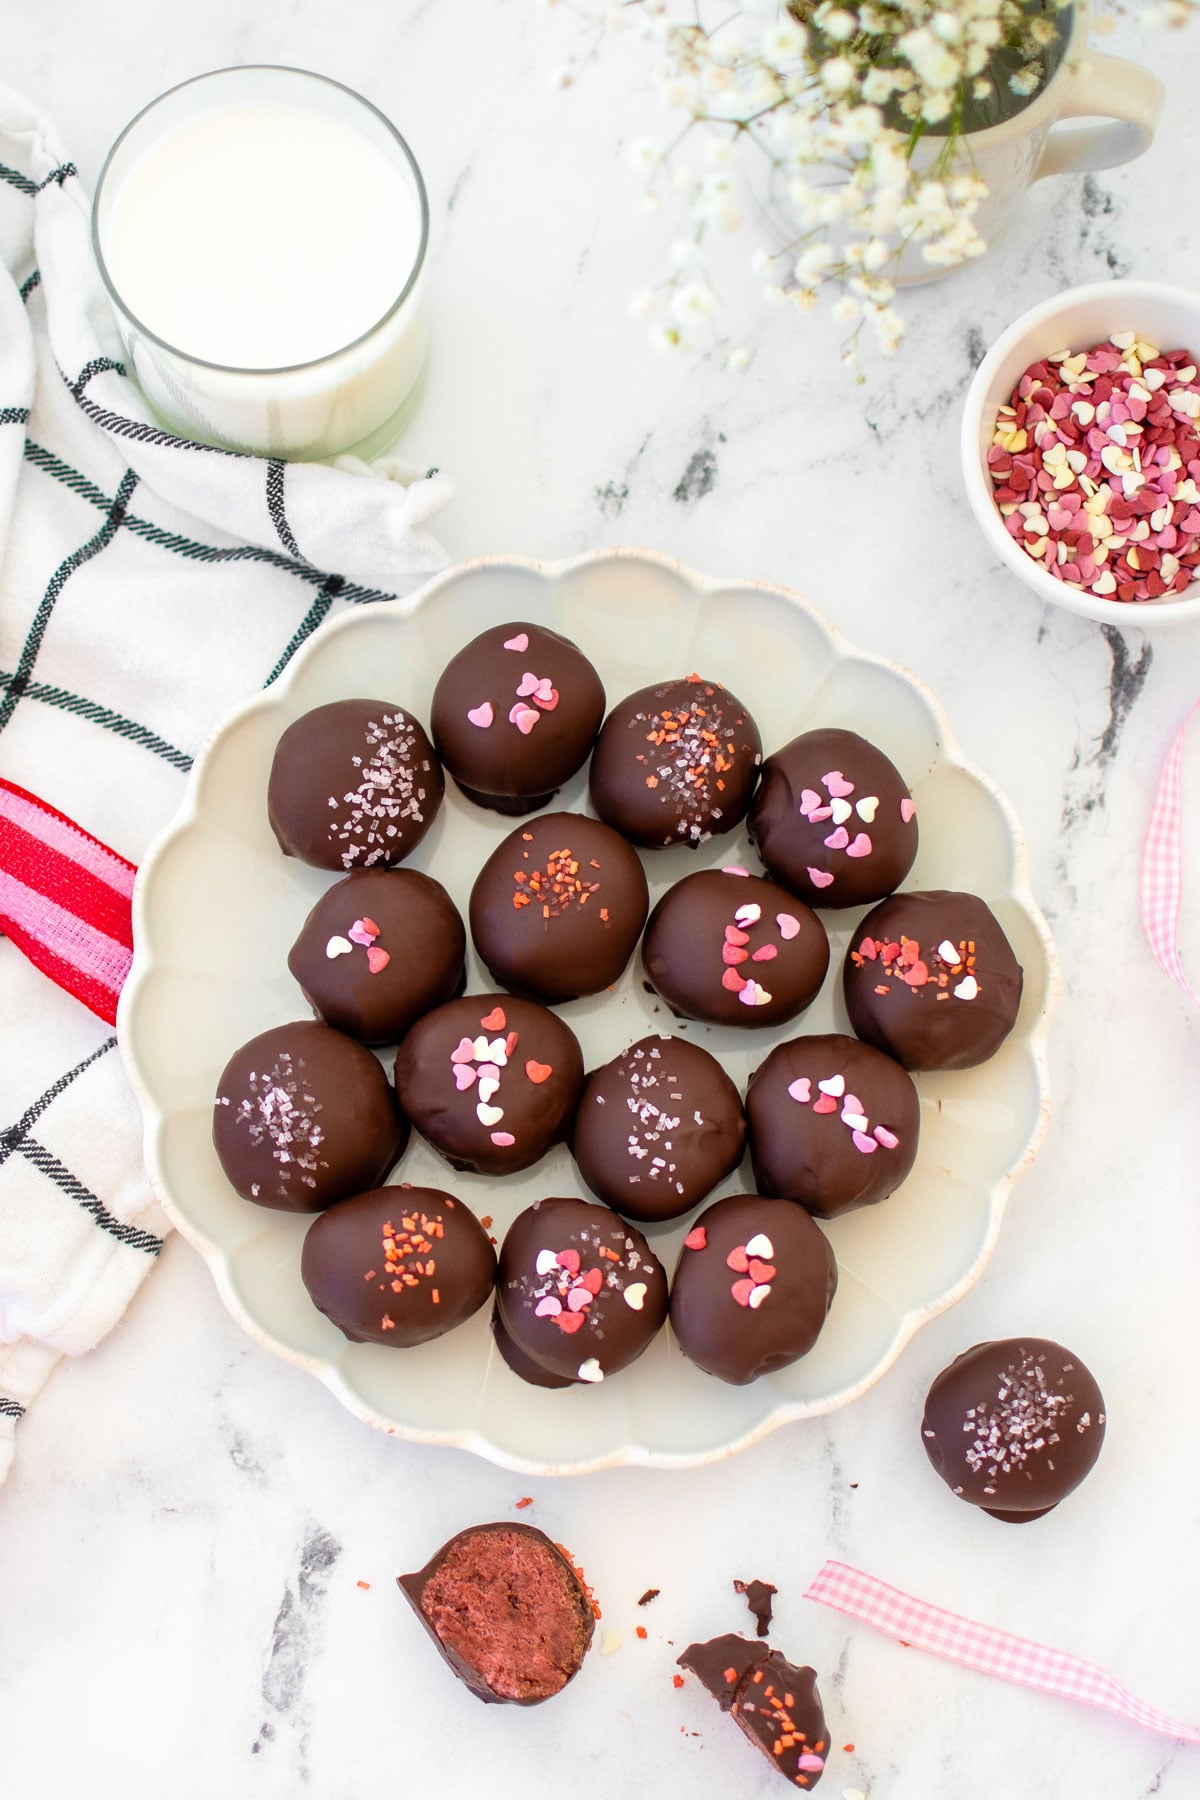
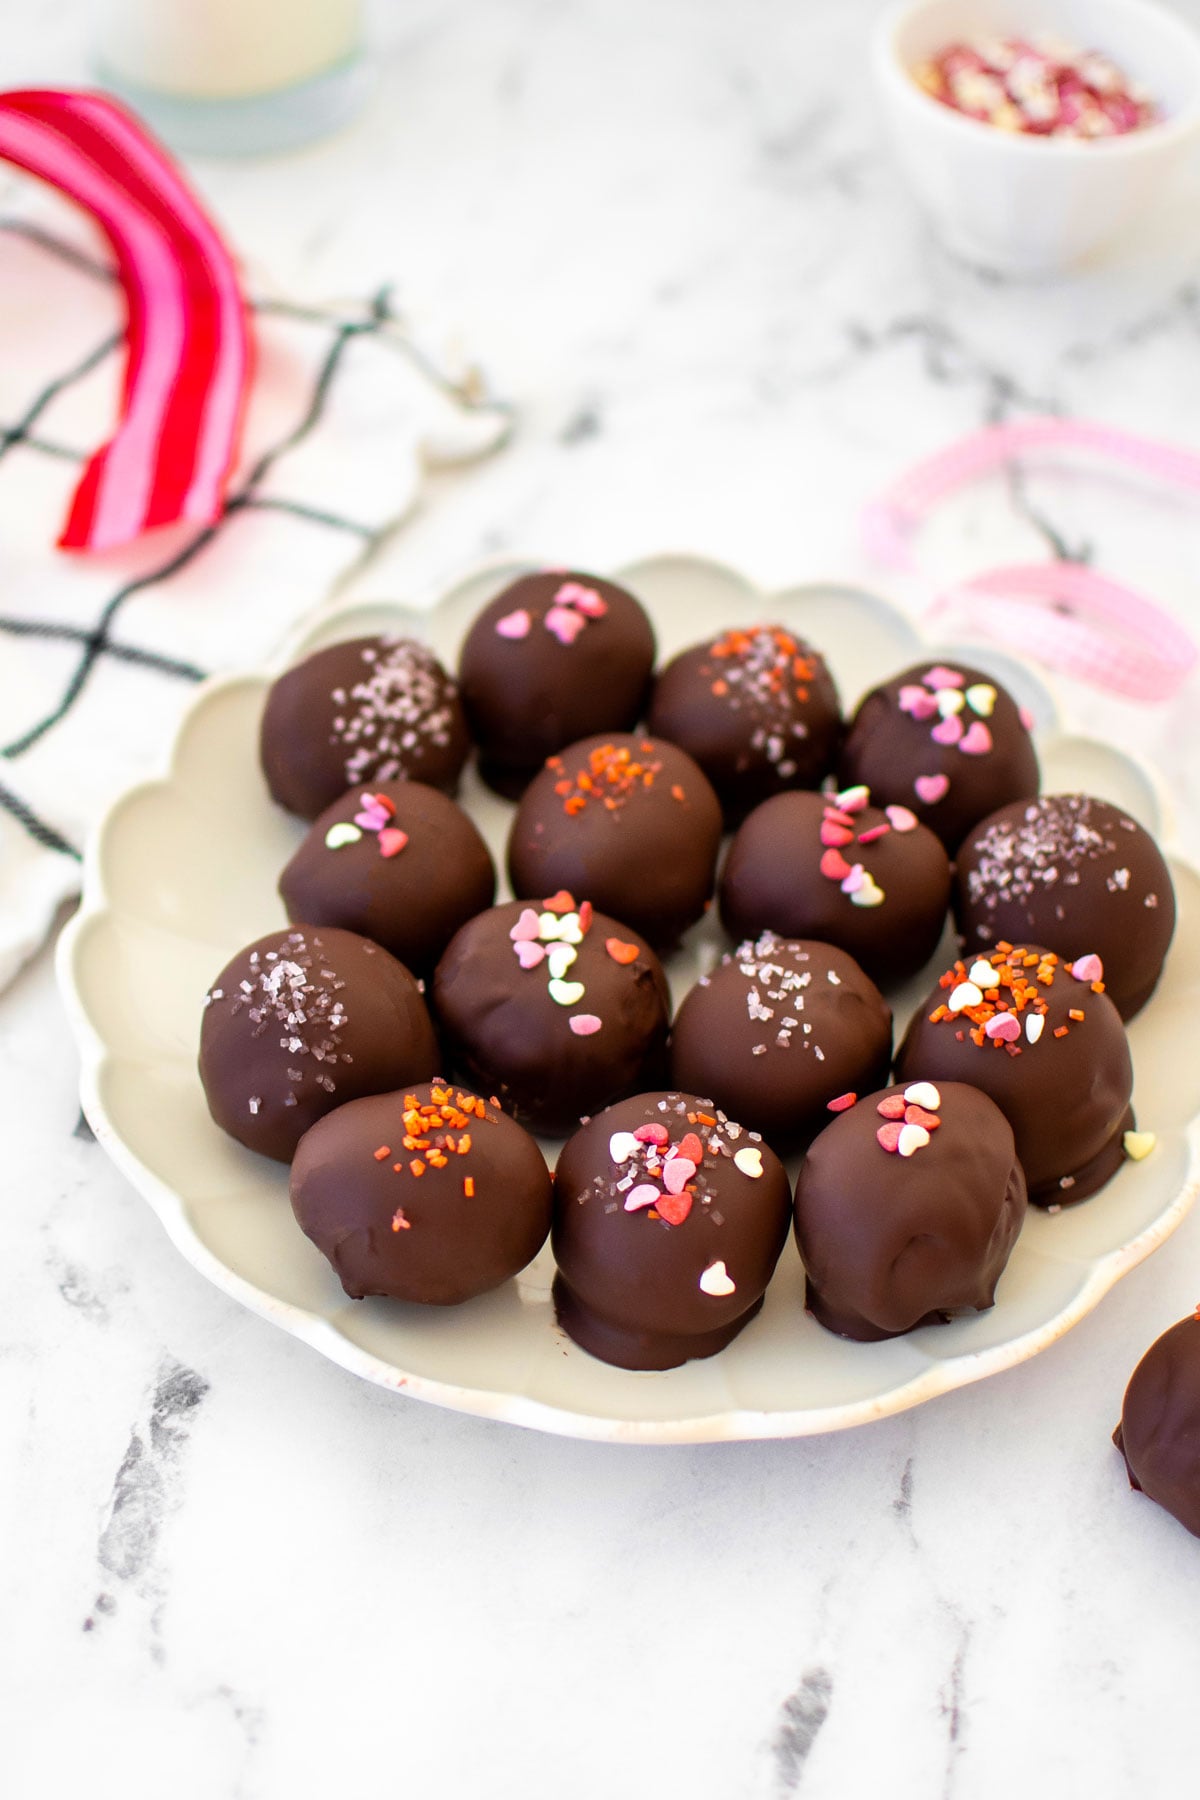
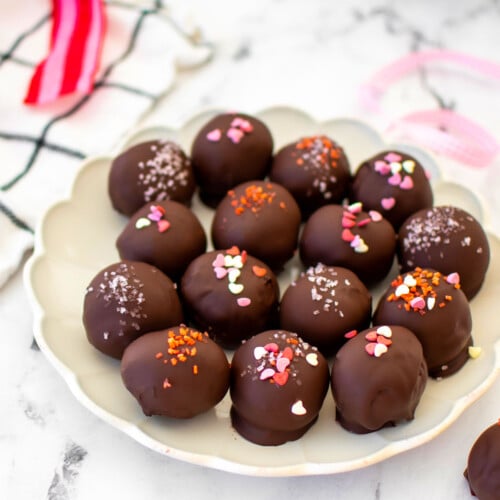
Eggless Red Velvet Sourdough Cake Balls
These Eggless Red Velvet Sourdough Cake Balls taste just like a bite of nostalgic red velvet cake, but without eggs and made using sourdough discard! Made without artificial colors, these homemade cake balls are something worth indulging in!
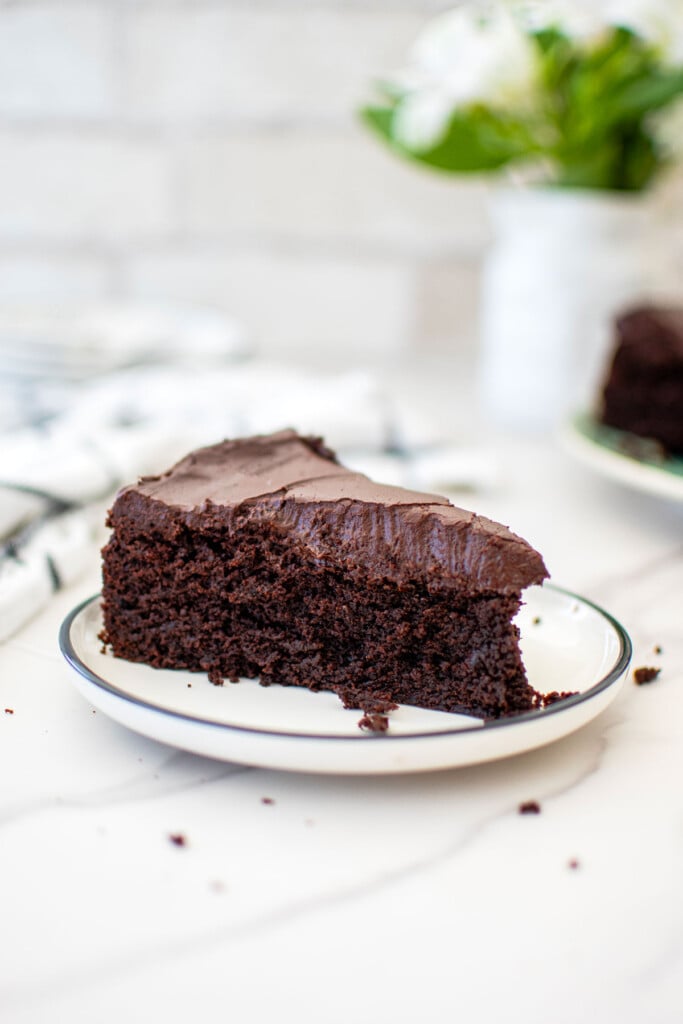
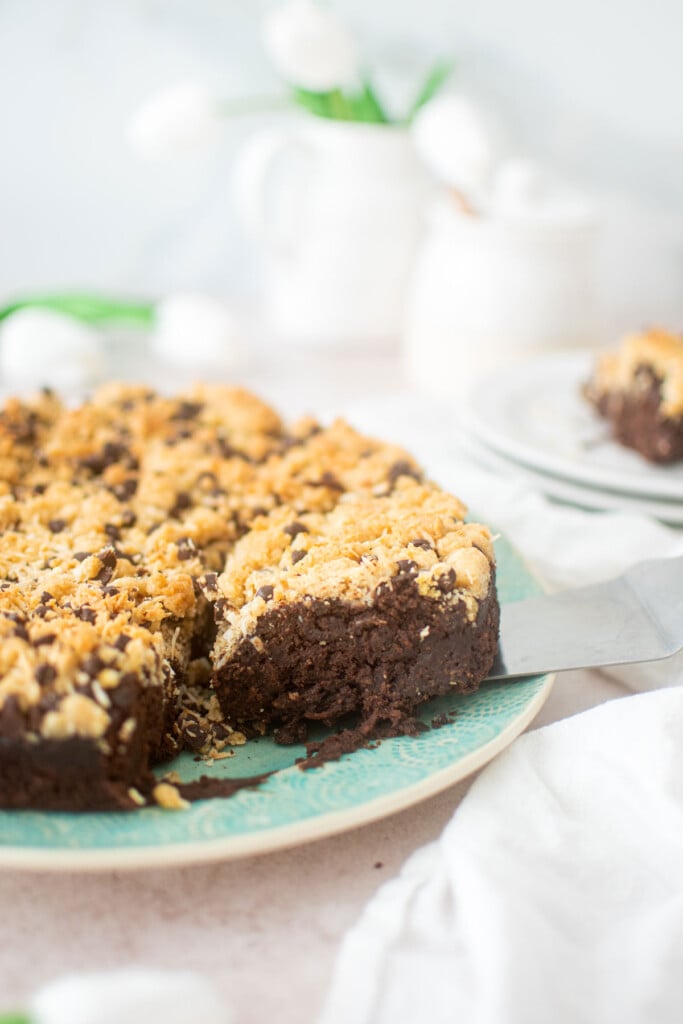
If you’re looking for more decadent chocolate recipes, try Chocolate Cream Drops, Avocado Oil Chocolate Cake, Sourdough Chocolate Chip Brownies, Bakery Style Chocolate S’mores Cookies With Fluff, Eggless Chocolate Heart Cake, or Eggless Chocolate Ganache Brownies.
A Quick Look At The Recipe
- Recipe Name: Eggless Red Velvet Sourdough Cake Balls
- Ready In: 2 hours 25 minutes
- Makes: 40 cake balls
- Main Ingredients: salted butter, cane sugar, cream cheese, Dutch cocoa
- Flavor Profile: Moist, cocoa-kissed cake centers meet creamy frosting, coated in chocolate
- Dietary Info: eggless
- Difficulty: Medium
- Why You’ll Love It: Bite sized red velvet cake coated in chocolate!
Summarize & Save This Content On
Why You'll Love This Recipe
- Eggless: Moist and delicious red velvet cake without eggs! Perfect for when you run out of eggs or have an allergy.
- Uses Sourdough Discard: This homemade red velvet cake recipe uses up sourdough discard creating a slightly tangy sourdough red velvet cake that pairs so well with the chocolate coating.
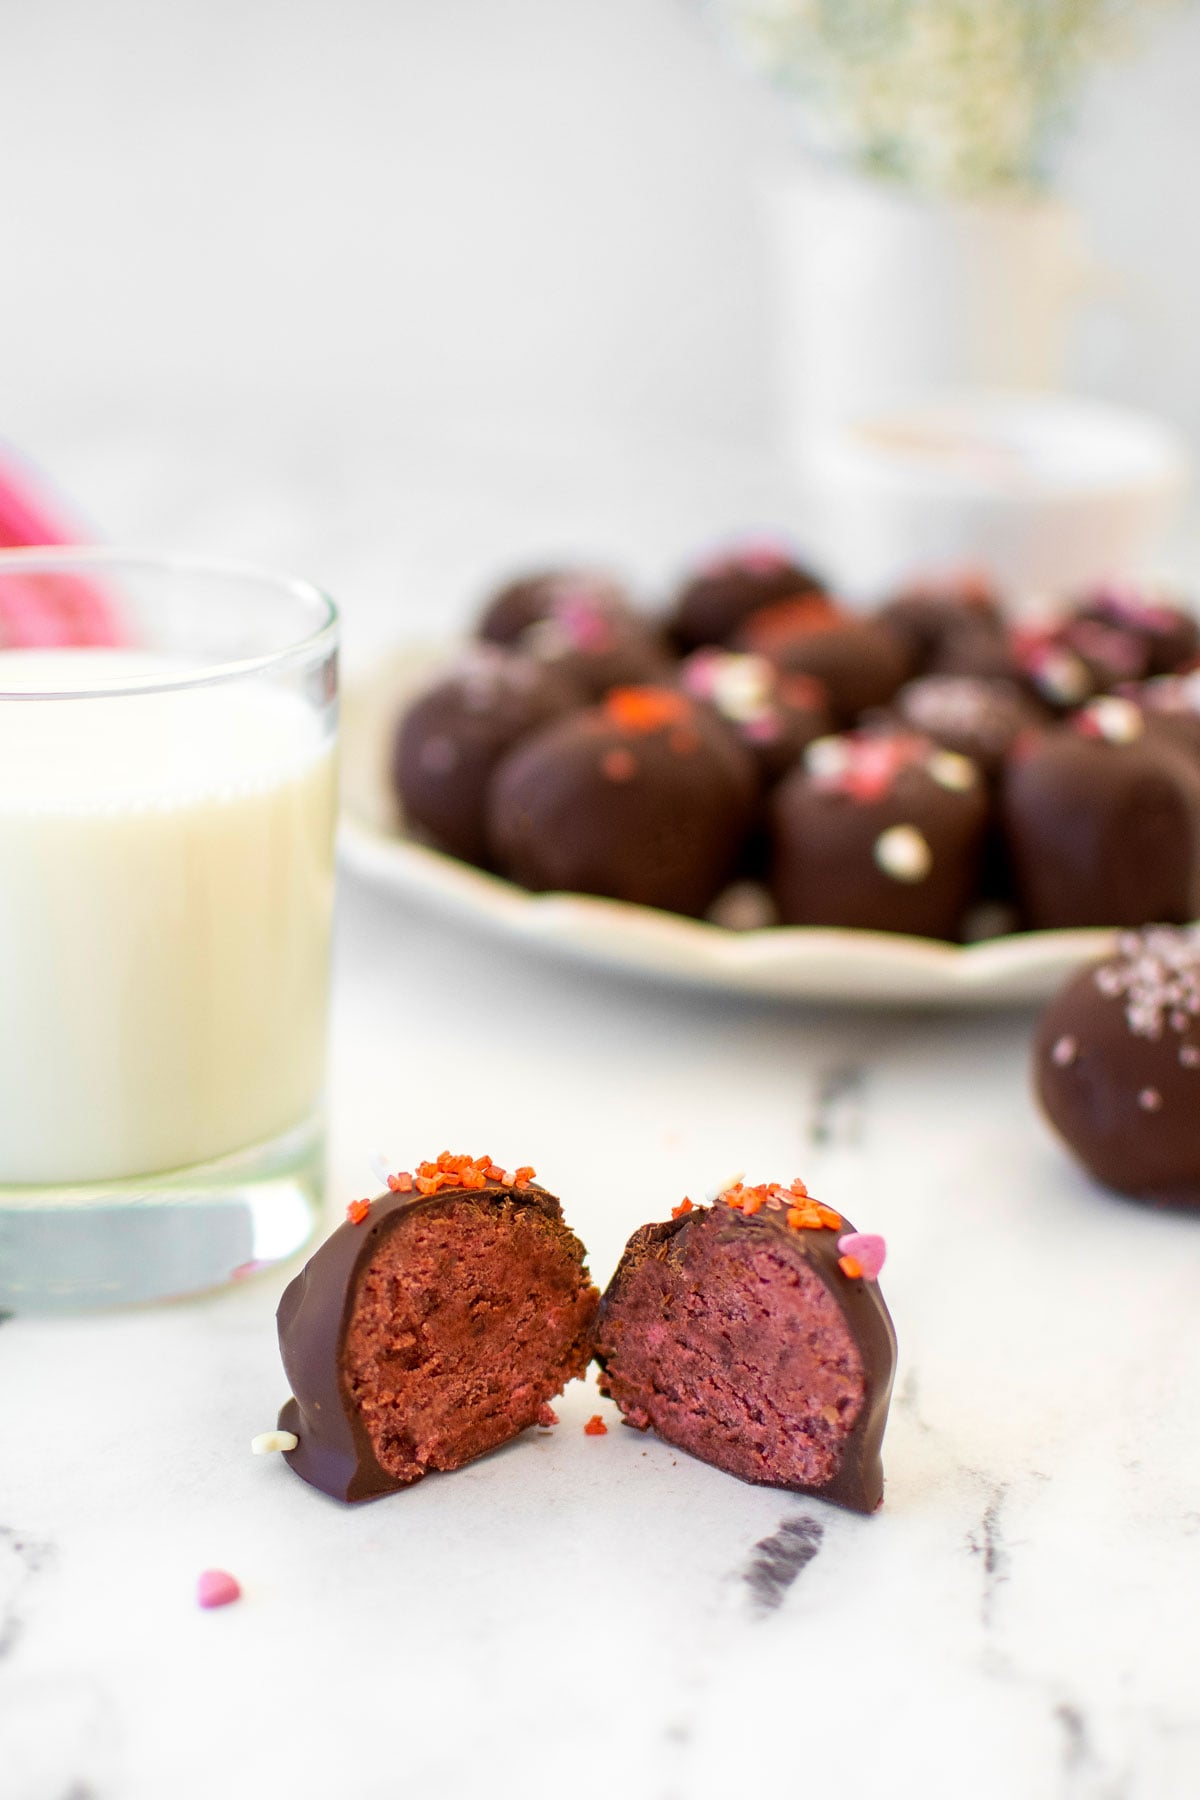
- Naturally Colored: I only use naturally colored dyes, and this naturally colored red velvet cake is no exception. I'm using an organic red dye that comes from beets and it's all you need to make these homemade cake balls without artificial colors!
- Better Than Candy: These Eggless Red Velvet Sourdough Cake balls are so much better than candy! If you love chocolate truffles, try this fun hybrid dessert of red velvet cake and chocolate truffle candy.
I love using up sourdough discard as it takes something that would have been waste and turns it into a delicious useful ingredient! And these red velvet cake balls are a wonderful way to use up your sourdough discard while making Valentine's Day dessert!
This is another collab with my friend Hannah at Make It Dough! Check out some of our other recipe collabs like Sourdough Blueberry Crumb Bars, Sourdough Jam Thumbprint Cookies, Sourdough Crescent Rolls, or Baked Chai Donuts with Sourdough Discard.
Ingredients
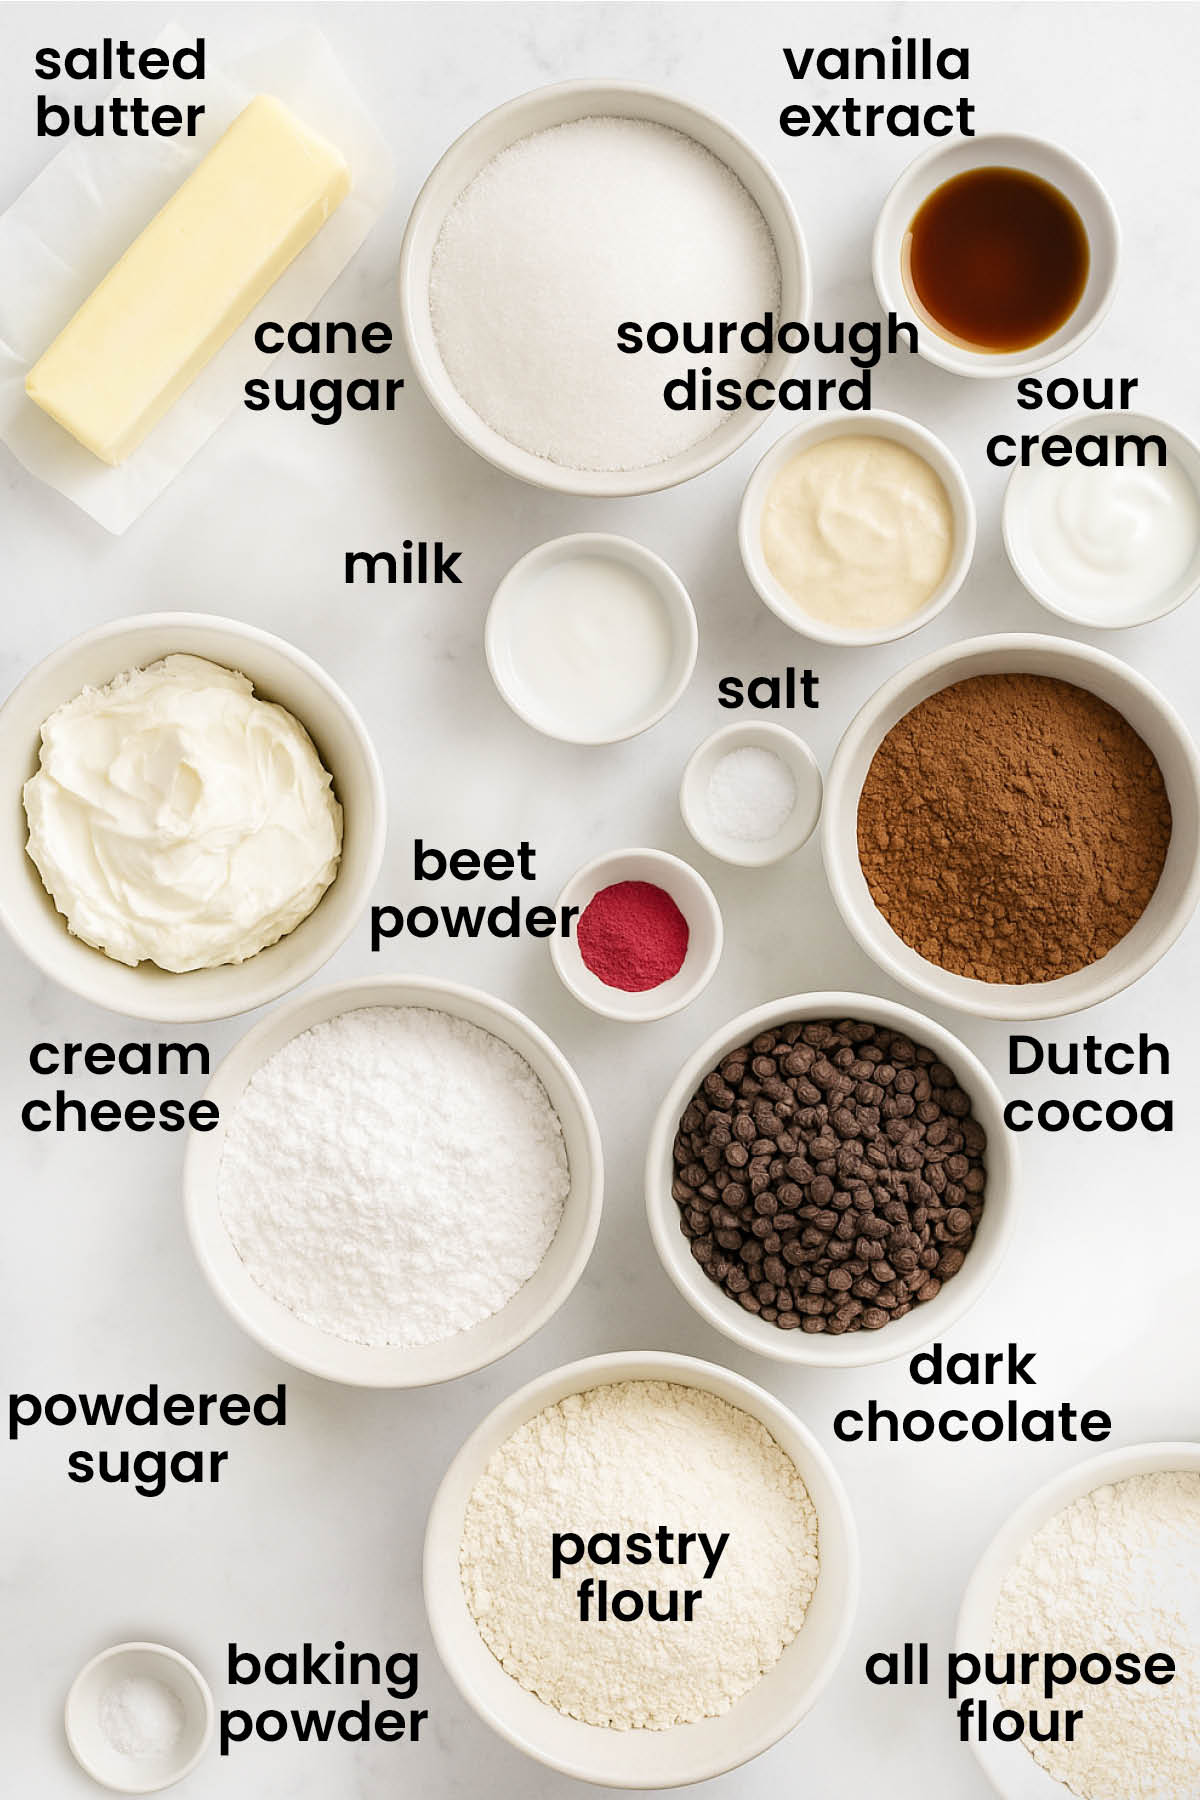
- Sourdough Discard: You can use your sourdough discard straight from the fridge. If you don't have sourdough discard, just mix together 57 grams of all purpose flour and 57 grams of water and use that in its place.
- Pastry Flour: I use organic pastry flour in these Organic Red Velvet Cake Balls for a light texture. You can also use Homemade Organic Cake Flour too.
- Dutch Cocoa Powder: I use organic Dutch cocoa powder for a rich chocolate flavor.
- Organic Red Food Dye: Use Suncore Foods Organic Red Dye, but organic beet powder also works.
- Dark Chocolate: I use organic mini dark chocolate chips for ease. This way I don't have to chop chocolate for melting it, plus these have no stabilizers, making them melt incredibly well!
- Natural Sprinkles: I top these homemade cake balls with naturally colored red and pink sugars for Valentine's Day. This is optional.
- Heart Sprinkles: I use India Tree Nature's Colors Heart Sprinkles for Valentine's Day, these are also optional.
*For a full list of ingredients and measurements, visit the recipe card below.
Baker's Tips for Eggless Red Velvet Sourdough Cake Balls
- Always weigh ingredients for the best results.
- Be sure to use softened butter for both the cake and the frosting.
- While I use salted butter, you can use unsalted if you prefer.
- I use Suncore Foods Organic Red Dye to color these homemade cake balls without artificial colors.
- Homemade cake balls are a great dessert to make ahead of time! Just store in the fridge until ready to serve.
- You can also freeze these organic cake balls. I put mine in a tupperware and then just take out a few and let them sit for about 30 minutes to thaw.
How to Make Eggless Red Velvet Sourdough Cake Balls
Step 1
Preheat the oven to 350°F. Line a 9-inch pan with parchment paper.
Step 2
To make the batter: In the bowl of a stand mixer fitted with the paddle attachment, add the butter, cane sugar, and vanilla extract. Mix on low until combined and there are no chunks of butter. Add the milk, sourdough discard, and sour cream and mix on low until combined.
In a separate bowl, add the pastry flour, all purpose flour, cocoa powder, red dye, baking powder, and sea salt and whisk together. With the mixer on low, slowly add in the flour mixture and mix on low until combined. Scrape down the sides of the bowl and mix again until completely combined. Transfer to the prepared baking pan.
Step 3
Bake for 35 minutes, or until a toothpick inserted in the center comes out clean. Allow to cool completely in the pan. (If you're baking at high altitude be sure to check the Notes at the bottom of the recipe for high altitude baking instructions).
Step 4
To make the frosting: In the bowl of a stand mixer fitted with the paddle attachment, add the butter, cream cheese, powdered sugar, red dye, and vanilla extract. Mix on low until combined and then speed mixer up to high for 1 minute or until light and fluffy. Scrape down the sides of the bowl and mix again until smooth.
Step 5
To make the balls: Line a baking sheets with parchment paper. Remove the cake from the pan, doesn’t matter if you break it, as it all needs to be broken up into pieces anyways. Add into the bowl with the frosting and mix on low for a few rotations (or stir with a spatula, or I like to just use my hands and get mess! This is also where gloves come in handy). Mix until evenly combined. Form into 40 balls, using your hands or a 1 ½ tablespoon cookie scoop, and place onto prepared baking sheet. Place in the freezer. I like to place in the freezer for about 10 minutes, then remove and reshape the balls as I have a very difficult time making perfectly round balls. You can skip this step if you like, or if you know how to roll perfect balls! Put back in the freezer.
Step 6
To make the coating: Melt all chocolate together using a double boiler, or in 30 second intervals in the microwave, making sure to stir between each interval. (I don’t temper the chocolate for these, as they have to be stored in the fridge because of the cream cheese frosting anyway!)
Step 7
Remove the balls from the freezer. Using a fork like a spoon, dip the cake balls into the dark chocolate and remove so excess chocolate drips off below. Place back on the parchment paper. Sprinkle each ball with the sprinkles after you place down. Do this now, as the cake balls are cold so the chocolate will harden quickly, so you want to do this after each dip or after every couple at least, so the sprinkles stick.
Dip and coat all the balls and top them with sprinkles. Place back in the freezer until the chocolate is set.
Recipe FAQ's
If you don't have pastry flour, you can also use cake flour in its place! You can also make Homemade Organic Cake Flour easily too!
Absolutely! If you don’t want to make cake balls (I feel you, they are a bit of work, but so insanely good, it’s worth it!). But, sometimes you just want a naturally colored red velvet cake, and you can use this recipe for that. Just bake the cake as is, remove it from the cake pan, and top it with the frosting. I would omit the red dye in the frosting for a traditional red velvet single layer cake!
Yes! Cake balls are an amazing dessert to make in advance as the cake and frosting is all rolled up in to a little ball and coated in chocolate. This makes them stay fresh longer than traditional cake would! So, you can make them a day or two in advance, just be sure to store in the fridge because of the cream cheese frosting.
Yes! You can definitely freeze cake balls. I love freezing them as the recipe makes 3 dozen. I put them in a Tupperware or zip bag and then just toss them in the freezer. They aren’t very fragile once made, and they’ll last for a month or possibly longer in the freezer. Just put in the fridge for a few hours and then they are ready to eat again.
More Chocolate Cake Recipes


Loved it? Tell us!
Thanks a waffle lot for stopping by 🧇 If you loved this recipe, sprinkle some love by leaving a ⭐⭐⭐⭐⭐ review — it inspires others to try this recipe and helps me organically reach dog loving foodies like you! I personally read and appreciate every message!
Also, be sure to subscribe to our YouTube channel and join John John and me in the kitchen for step by step recipe videos! And subscribe to our newsletter for new and seasonal recipes!
Eggless Red Velvet Sourdough Cake Balls
Equipment
- Digital Food Scale
- Stand Mixer
- 9-inch Cake Pan
- Parchment Paper Cake Rounds
- Half Sheet Pan
- Parchment Paper Sheets
- Heatproof Mixing Bowl
Ingredients
Batter
- 113 grams salted butter (softened)
- 170 grams cane sugar
- 1 ½ teaspoons vanilla extract
- 113 grams sourdough discard (room temperature)
- ½ cup milk (room temperature)
- 57 grams sour cream (room temperature)
- 109 grams pastry flour (or cake flour)
- 43 grams all purpose flour
- 15 grams Dutch cocoa powder (sifted)
- 2 teaspoons Suncore Foods Organic Red Dye
- ¾ teaspoon baking powder
- ½ teaspoon fine sea salt
Frosting
- 113 grams salted butter (softened)
- 113 grams cream cheese
- 425 grams powdered sugar (sifted)
- 2 teaspoons Suncore Foods Organic Red Dye
- 1 teaspoon vanilla extract
Coating
- 510 grams dark chocolate chips
Toppings
- India Tree Nature’s Colors Pink Sugar
- India Tree Nature’s Colors Red Sugar
- India Tree Nature’s Colors Heart Sprinkles
Instructions
- Preheat the oven to 350°F. Line a 9-inch pan with parchment paper.
- To make the batter: In the bowl of a stand mixer fitted with the paddle attachment, add the butter, cane sugar, and vanilla extract. Mix on low until combined and there are no chunks of butter. Add the milk, sourdough discard, and sour cream and mix on low until combined.
- In a separate bowl, add the pastry flour, all purpose flour, cocoa powder, red dye, baking powder, and sea salt and whisk together. With the mixer on low, slowly add in the flour mixture and mix on low until combined. Scrape down the sides of the bowl and mix again until completely combined. Transfer to the prepared baking pan.
- Bake for 35 minutes, or until a toothpick inserted in the center comes out clean. Allow to cool completely in the pan.
- To make the frosting: In the bowl of a stand mixer fitted with the paddle attachment, add the butter, cream cheese, powdered sugar, red dye, and vanilla extract. Mix on low until combined and then speed mixer up to high for 1 minute or until light and fluffy. Scrape down the sides of the bowl and mix again until smooth.
- To make the balls: Line a baking sheets with parchment paper. Remove the cake from the pan, doesn’t matter if you break it, as it all needs to be broken up into pieces anyways. Add into the bowl with the frosting and mix on low for a few rotations (or stir with a spatula, or I like to just use my hands and get mess! This is also where gloves come in handy). Mix until evenly combined. Form into 40 balls, using your hands or a 1 ½ tablespoon cookie scoop, and place onto prepared baking sheet. Place in the freezer. I like to place in the freezer for about 10 minutes, then remove and reshape the balls as I have a very difficult time making perfectly round balls. You can skip this step if you like, or if you know how to roll perfect balls! Put back in the freezer.
- To make the coating: Melt all chocolate together using a double boiler, or in 30 second intervals in the microwave, making sure to stir between each interval. (I don’t temper the chocolate for these, as they have to be stored in the fridge because of the cream cheese frosting anyway!)
- Remove the balls from the freezer. Using a fork like a spoon, dip the cake balls into the dark chocolate and remove so excess chocolate drips off below. Place back on the parchment paper. Sprinkle each ball with the sprinkles after you place down. Do this now, as the cake balls are cold so the chocolate will harden quickly, so you want to do this after each dip or after every couple at least, so the sprinkles stick.
- Dip and coat all the balls and top them with sprinkles. Place back in the freezer until the chocolate is set.
- Store in the fridge for up to 7 days.
Notes
- Always weigh ingredients for the best results.
- Be sure to use softened butter for both the cake and the frosting.
- While I use salted butter, you can use unsalted if you prefer.
- I use Suncore Foods Organic Red Dye to color these homemade cake balls without artificial colors.
- Homemade cake balls are a great dessert to make ahead of time! Just store in the fridge until ready to serve.
- You can also freeze these organic cake balls. I put mine in a tupperware and then just take out a few and let them sit for about 30 minutes to thaw.
Nutrition
The Bake Shop
Visit The Bake Shop for foodie inspired tees, sweatshirts, and accessories. Find my favorite kitchen tools (with discounts!) in the Kitchen Shop. And shop our collection of food inspired dog accessories too!

These are so vibrant and colorful without any artificial colors!