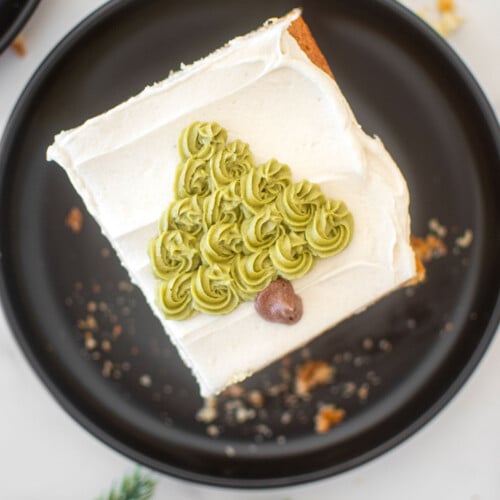
How to Pipe Buttercream Christmas Trees 5 Ways

Give your desserts a festive twist with buttercream Christmas trees. This step-by-step tutorial covers five different ways to decorate your treats.
Equipment
- Digital Food Scale
- Stand Mixer
- Piping Bags
- Coupler
- Ateco Tip #6
- Ateco Tip #12
- Ateco Tip #15
- Ateco Tip #21
- Ateco Tip #101
Ingredients
Frosting
- 170 grams salted butter (softened)
- 340 grams powdered sugar (sifted)
- 1 teaspoon vanilla extract
- 2 to 3 tablespoons milk (or water)
Decorating
- Suncore Foods Organic Green Dye
- Dutch cocoa powder
- Sprinkles (optional)
Instructions
- Be sure to have whatever dessert you’ll be decorating made before making the frosting for the trees. This is the last step in decorating your cake, cupcakes, cookies, or brownies.
- To make the frosting: In the bowl of a stand mixer fitted with the paddle attachment, add the butter, powdered sugar, vanilla extract, and milk. Mix on low until combined.
- Speed up mixer to high and mix for 2 to 3 minutes or until it’s light and fluffy. Be sure to scrape down the sides of the bowl halfway through and continue to mix. You want the frosting to be very smooth, creamy, and not super stiff as you’ll need to pipe it out of small decorating tips. If the frosting seems very stiff, you can add a bit more milk (1 tablespoon at a time) until you get the desired consistency.
- Remove a small amount of frosting (about ¼ cup) and put in a small bowl. Add in a small amount of Dutch cocoa powder (about 1/2 to 1 teaspoon) and stir to combine completely. Add more if you want a darker brown. Transfer this to a piping bag with Ateco tip #12 or you can use no tip at all and just cut a small hole.
- With the remaining frosting, you can color it different colors if you want different colored trees (such as green and pink). Or you can color it all one color if you just want to do green. Add in a small amount of food coloring and stir until you get your desired colors.
- If you’re using one frosting and want to make multiple different types of trees, then make sure to put a coupler into the piping bag before filling it with frosting. The coupler will allow you to swap out the different tips.
- Once you have your piping bags made up, then it’s time to start piping your trees.
- For Ateco tip numbers 6, 15, 21, and 101 I am using the same technique, but you get different results for the different kinds of tips. For this technique, you’ll start by piping a zigzag triangle wherever you want your Christmas tree. Once the tree is piped, then make a small line at the bottom using the chocolate frosting.
- For the next type of tree, use Ateco tip #21 and pipe small dollops of frosting in the shape of a triangle. Then add a small line of the chocolate frosting at the bottom for the trunk.
- For the last type of tree, use Ateco tip #15 and pipe small rosettes by pipe a spiral (starting in the middle, going outwards) until you get your desired size. Do this in the shape of a triangle, starting with one at the top, then two on the second row, three on the third row and so on until you get the size tree you like. Finish with a small line of the chocolate for the trunk.
- If you are adding sprinkles on top of your trees, you should do that immediately after piping them so that they stick as buttercream will begin to harden once it’s piped out of the bag.
- Continue to decorate your dessert with Christmas trees anywhere you want them!
- If you have extra frosting, you can store it in an airtight container in the fridge for up to 5 days.
Video
Notes
Tips
- If you are decorating a cake or cupcakes, you may be able to just use a little bit of the frosting from that recipe and use this technique. It just depends on how much frosting the cake recipe makes, but you may want to consider if you don’t want a ton of leftover frosting.
- If you want to decorate cookies or brownies then you’ll need to make additional frosting, so you can use the recipe here.
- Make sure your butter is soft when starting the buttercream. I prefer to leave butter out on the counter to soften naturally. You can do this overnight in the wintertime.
- Always sift powdered sugar, this is key for smooth and creamy buttercream. But it’s even more key to ensure you have no chunks in your buttercream for piping out of small decorating tips like we’re doing here.
- You can color the frosting any way that you like!
- You can use larger versions of these decorating tips if you are making a larger cake. Ateco makes larger option for all of these tips.
- Vegan: Use vegan butter or shortening and nondairy milk.
- High Altitude — Follow the recipe as noted.
Nutrition
Calories: 107kcalCarbohydrates: 14gProtein: 0.1gFat: 6gSaturated Fat: 4gPolyunsaturated Fat: 0.2gMonounsaturated Fat: 1gTrans Fat: 0.2gCholesterol: 15mgSodium: 46mgPotassium: 4mgSugar: 14gVitamin A: 179IUCalcium: 3mgIron: 0.01mg
Want more recipes?Follow along on @mimisorganiceats for more inspiration!