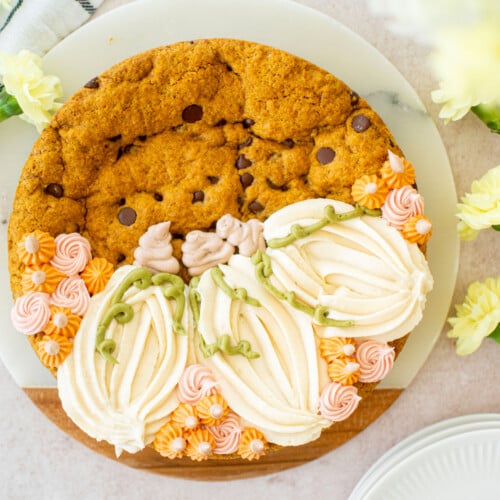
Pumpkin Chocolate Chip Cookie Cake
Enjoy the taste of fall with this simple and delicious Pumpkin Chocolate Chip Cookie Cake. A festive treat for any fall gathering or celebration!
Equipment
- Digital Food Scale
- Stand Mixer
- 8-inch Cake Pan
- Parchment Paper Cake Rounds
- Piping Bags
- Ateco Tip #846
- Ateco Tip #8
- Ateco Tip #6
- Ateco Tip #21
- Ateco Tip #32
Ingredients
Dough
- 113 grams salted butter (softened)
- 170 grams light brown sugar
- 1 teaspoon vanilla extract
- 113 grams pumpkin puree
- 255 grams all purpose flour
- 1 teaspoon pumpkin spice
- ½ teaspoon baking soda
- ½ teaspoon fine sea salt
- 198 grams semi sweet chocolate chips
Frosting
- 113 grams salted butter (softened)
- 212 grams powdered sugar (sifted)
- 2 tablespoons milk
- 1 teaspoon vanilla extract
- Matcha powder
- Dutch cocoa powder
- Freeze dried strawberry powder
- India Tree Nature’s Colors Orange Dye
Instructions
- Preheat the oven to 350°F. Line an 8-inch cake pan with parchment paper.
- To make the dough: In the bowl of a stand mixer fitted with the paddle attachment, add the butter, brown sugar, and vanilla extract. Mix on low until combined and there’s no butter chunks.
- Add in the pumpkin puree and then next, add the dry ingredients: flour, pumpkin spice, baking soda, and sea salt. Mix together until a stiff dough forms.
- Add in the chocolate chips and mix to combine completely.
- Transfer the dough to the prepared pan. Use your hand and press it out evenly.
- Bake for 30 to 35 minutes or until the middle looks set and the edges look dry. Allow to cool completely in the cake pan.
- To make the frosting: In the bowl of a stand mixer fitted with the paddle attachment, add the butter, powdered sugar, and vanilla extract. Mix on low until combined and then speed mixer up to high and mix to 2 to 3 minutes or until it’s light and fluffy.
- Transfer about half the white frosting to a piping bag with Ateco tip #846.
- Divide the remaining frosting in 4 bowls, two of which have just a small amount, about 2 tablespoons maybe. Then, divide the remaining frosting in half.
- In one of the small amount bowls, add a pinch of cocoa powder to one and stir in to make chocolate buttercream. Transfer the chocolate to a piping bag with Ateco tip #8 for the stems.
- Add a pinch of matcha powder to the other small dish with just a small amount and stir in. Transfer the green to a piping bag with Ateco tip #6 for the vines.
- In one of the bowls with more frosting, add a pinch of strawberry powder and stir it in. Add to a piping bag with Ateco tip #21.
- For the remaining frosting, add a few drops of India Tree Nature’s Colors Orange dye into the last bowl. You can use a few drops for pastel or more for a darker orange. Transfer to a piping bag with Ateco tip #32.
- Starting with the white frosting, pipe a straight line of buttercream on the cookie cake wherever you want your first pumpkin to be. This is the middle of the pumpkin. Then, pipe a slightly curved line on each side of the first line to create the round shape of the pumpkin. These lines should be similar to writing a “C” or the curved part of the “D” as far as shape goes. Continue to do this a few times, anywhere you want a pumpkin on the cake. I made 3 pumpkins on my cake, but you could do more or less or bigger ones or smaller ones.
- Next, use the brown and pipe chocolate stems onto the pumpkins.
- Add little squiggly lines of green for the vines.
- Fill in with rosettes of pink for the flowers by piping a spiral. Last, add dollops of orange for baby pumpkins. And top those with a dollop of the brown for a stem. This can be totally free form so have fun with it!
- Store in an airtight container for up to 3 days.
Video
Notes
Tips
- Use a digital food scale for the best results.
- I'm using my stand mixer for ease, but if you prefer to use a large bowl with a hand mixer you can do that for both the cookie dough and the frosting. You'll definitely need a large mixing bowl, don't use a medium-sized bowl, especially for the frosting is using a hand mixer.
- Make sure your butter is soft, for both the cookie cake and the frosting.
- Easily make this vegan by using your favorite vegan butter and milk. I recommend Miyoko's butter and coconut milk for the best flavor.
- You can use a round or square 8-inch cake pan. If you only have a 9-inch cake pan or even a 9-inch springform pan, you can use that too. The cookie cake just won’t be as thick.
- The decorating is totally optional. Feel free to just spread frosting on top of the cookie cake any way you like!
- And if you want to just decorate with another frosting, you can try it with Caramel Buttercream Frosting, Vanilla Bean Buttercream Frosting or Homemade Chocolate Ganache instead.
- Be sure to store leftovers in an airtight container. You can also store this in a cake dome!
- High Altitude — Follow the recipe as noted.
Nutrition
Calories: 657kcalCarbohydrates: 86gProtein: 5gFat: 33gSaturated Fat: 20gPolyunsaturated Fat: 1gMonounsaturated Fat: 9gTrans Fat: 1gCholesterol: 63mgSodium: 407mgPotassium: 248mgFiber: 3gSugar: 57gVitamin A: 2923IUVitamin C: 1mgCalcium: 55mgIron: 3mg
Want more recipes?Follow along on @mimisorganiceats for more inspiration!